Gann Square Top/Bottom


Overview
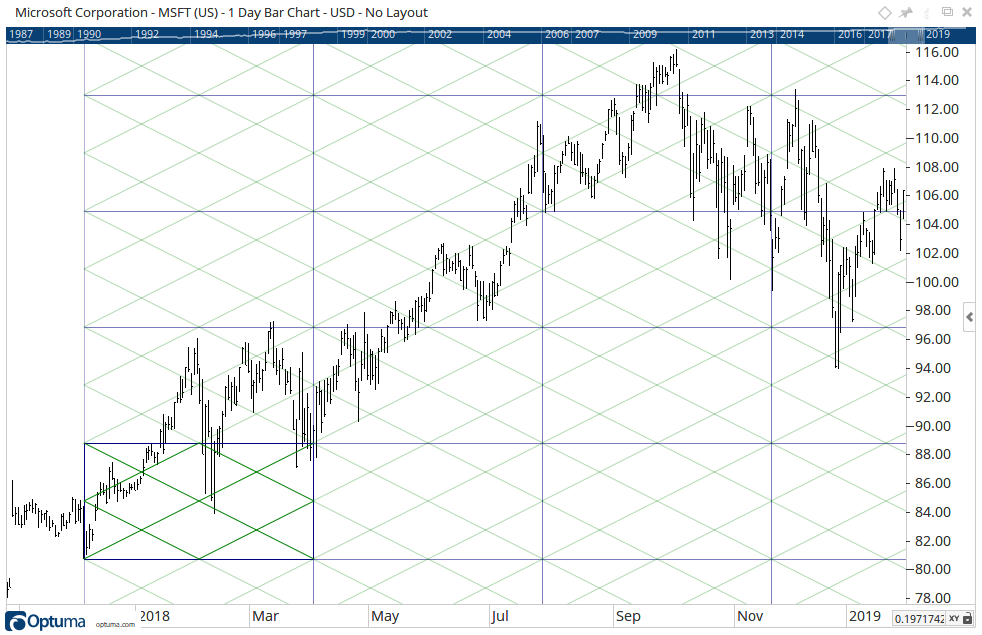
The concept of squaring the top or a bottom of a market is an important one in any Gann analysis. This tool draws the Gann Square using the value of where it is applied, eg on a high of 100 the square will be 100 bars wide and 100 points high.
In the example below, the Gann Square Top/Bottom tool was applied to the low at 80.70 which will draw the square 81 bars wide. With a Price Unit of 1 the top of the square would be at 161.40 (2 x 80.70) so we need to use a Price Factor to make it relevant to the chart. Using a Price Factor of 0.1 the squares will be 80.70 x 0.1 = 8.07 high:

To add the tool to your chart, select the tool from the Gann tool group, and left-click on the bar on the chart you wish to calculate the tool from. Optuma will then draw the tool using the default settings.
Video
Note: This video is a clip taken from the Gann Changes in Optuma 1.4 video by Mathew Verdouw. You can view the full version here:
https://ganntrader.com/videos/gann-changes-in-1-4/
Actions & Properties
Actions

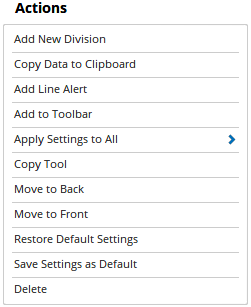
Add New Division: Select this action to add a new division to the tool.
</span>Copy Data to Clipboard: Will copy the tool’s values to the clipboard which can then be inserted into a spreadsheet, for example, allowing for further analysis.
Add Line Alert: Selecting this action will set a Line Alert based on the selected line.
Add to Toolbar: Adds the selected tool to your custom toolbar.
Apply Settings to All: When multiple Gann Square Top/Bottom tools have been applied to a chart, page or workbook, this action can be used to apply the settings of the one selected to other instances of the tool. This is a great time saver if an adjustment is made to the tool - such as line colour - as this allows all the other Gann Square Top/Bottom tools in the chart, page or entire workbook to be updated instantly.
Copy Tool: Allows you to copy the selected tool, which can then be pasted onto a different chart window.
Move to Back: If the tool is displaying in front of other tools or indicators clicking this action will move the tool view to the background.
Move to Front: If the tool is displaying behind other tools or indicators on the chart, clicking this action will bring the tool to the forefront.
Restore Default Settings: Click this action if you have adjusted the default settings of the tool, and wish to return to the standard properties originally installed with Optuma.
Save Settings as Default: If you have adjusted any of the tool’s properties (colour, for example) you can save the adjustments as your new default setting. Each time you apply a new Gann Square Top/Bottom to a chart, the tool will display using the new settings.
Delete: Deletes the tool from the chart.
Properties

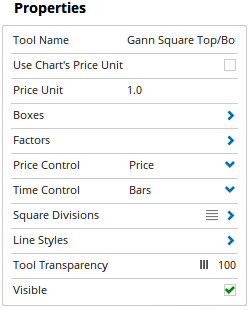
Tool Name: Allows for the name of the tool to be changed, as displayed in the Structure Panel.
Use Chart’s Price Unit: By default, the price unit of the chart is used in the tool calculation. Untick the box to manually adjust the value in the Price Unit property.
Price Unit: This option is available when the Use Chart’s Price Unit box is unticked (see above). Enter a new value to manually determine what one unit of price is equal to in the tool’s calculation (eg 0.1). For more information, click here.
Boxes: Use this option to increase or decrease the number of squares up and down, and to the left and right of the range.
Factors: Used to scale the time interval or price so that it is in proportion to the scale. e.g. if the price range is $0.90 then to create 90 days/degrees/bars in time, a factor of 0.01 is entered here.
Overlays: This option is used to divide the squares into thirds and/or eighths. When applied you are able to adjust the line styles, colours, and width in the drop-down box.
Gann Box Type: This determines how the squares are drawn. The options are Traditional, Empty Box, Crossed Box, or Full Gann Box.
Time Control: Sets the time measurement (or degree counts of planets if using the Astronomical option) for calculating the Gann Squares, e.g. hours, calendar days, weeks.
Line Styles: The Line Styles property allows you to adjust the type of lines, their width and colours. There are 8 styles available: Solid, Dots, Dash, Dash Dots, Long Dash, Long Dash Dot, Long Dash Dot Dot, Stippled. The line widths can be increased by moving the slider bar to the right.
Tool Transparency: Use this slider bar to adjust the transparency of the tool. Moving the slider to the left will increase the transparency.
Visible: Un-tick this checkbox to hide the tool from the chart.