Pressure is on the January Barometer
The January Barometer is an investing theory that suggests that the performance of the stock market in the ...
Although this article is focused on Entry Triggers for trade initiation, the successful trader knows that Entry Triggers are just one component of success.
Although this article is focused on Entry Triggers for trade initiation, the successful trader knows that Entry Triggers are just one component of success. In order to have a comprehensive understanding of success in trading, any discussion on the Entry Trigger topic must also address the perspective and context of the underlying market condition.
Perhaps I should start by expressing my thanks to Ray Barros, who taught and guided me at a crucial phase of my growth as a trader. Essentially, Ray’s philosophy is to identify the direction and trend of the higher timeframes (he calls this the Perspective). The Perspective timeframes have a strong impact on the direction of the lower timeframe Trader’s Trend.
If the higher timeframe direction is up, the lower timeframe trend is likely to be up. As long as the analysis suggests that the uptrend is in place and is likely to continue, then the trading Stance is set. In a continuing uptrend, the odds favor a buy-first strategy, and obviously, in a continuing downtrend, the odds will favor a sell-first strategy. In a nutshell, this is a simplified statement on how I determine Perspective, my Trader’s timeframe trend, and therefore, my stance.
It is not within the scope of this article to discuss analysis methods to determine whether the prevailing trend is likely to change. Once this can be assessed, then I can initiate a trade against the prevailing trend in the belief the current trend is exhausting, and that a new change in trend is likely to occur. For example, the prevailing trend in the US markets just before the 2007 peak was up. It is a matter of historical record the market rapidly declined after the 2007 peak. Obviously, trading in the direction of the prevailing uptrend at the 2007 peak can result in financial loss. It is also obvious that changing the stance by initiating sell trades against the prevailing trend, resulted in joining the new downtrend early - before the downtrend was established.
In other words, Perspective gives me the context to decide my Stance.
To recap:
Once the Stance is set, the next step is to locate low risk, high probability zones to start the hunting process for the trade entry. Ray has emphasized that in an uptrend it will be less risky, and more rewarding to buy the undervalued correction. In other words, buy at what I assess to be where the correction is likely to end. The next bullish impulse is probably a large and strong move after the resting phase of the correction ends. Aggressive traders can elect to buy the upside breakout - buying high - in the expectation of a strong explosive move to stratospheric prices!
Obviously, if I assess the trend to be bearish, my preference will be to sell at the end of the bear market rally in the expectation the next bearish impulse will be large and prolonged. The aggressive trader can also elect to sell a bearish breakout - selling low - in the belief the future price can be significantly lower, sooner rather than later.
One simple tool I use is the Slow Stochastic. This tool identifies:
Therefore, if I assess the trend to be bullish and likely to continue, I need to see Slow Stochastic in its oversold, undervalued zone.
Obviously, if I assess the trend to be bearish and likely to continue, I need to see Slow Stochastic in its overbought or overvalued zone.
Once the Perspective, Stance and Low Risk Zone are determined, I need to initiate, or trigger the trade entry. The analogy here is I am now ready to draw my sword, and need to correctly time my deployment. I will shortly be sharing ten Trade Triggers I use - but bear with me as I need to address other key components of my trading methodology first.
Once the trade is triggered, the next step is to pre-plan the exit strategy. This is a crucial requirement for trading longevity because you can control the exit of a loss and make it relatively small compared to the profit exit - which has to be relatively large as compared to the planned loss. This determination of risk and reward in turn allows for correct position sizing, which is again a key consideration in my survival as a trader. Trade Management is simply the staggered profitable exit of the initiated trade entry. I subscribe to the “Single Entry, Multiple Exit” strategy - my initial trade size must allow for multiple lot size.
It is not within the scope of this article to focus on Money, Risk, and Trade Management, however this cursory discussion is still essential to illustrate my overall trading methodology.
I have explained my trading philosophy as taught to me by Ray Barros. However, every one of us can’t be a carbon copy of our mentors. I needed a different metaphor to better internalize what I learned from Ray.
I have always had a strong interest in Japanese Martial Arts and have had training in Aikido. The underlying concept in Aikido is that a small force can control and direct a large force; a weaker or smaller trainee can control and direct the motion and momentum of a larger, stronger opponent. This is done by the application of techniques or waza based on the idea of harmonizing the defender’s actions with the attacking student’s speed and momentum. As the student progresses, his understanding, application, and timing become better. His control of the opponent becomes competent.
In the trading context, all traders, both individual and institutional, are like combatants. The market itself is the opponent we need to win from. The issue here is the capitalization of each trader (individual or institutional) is small compared to the overall market. Think of the Central Banks who are grouped with the large institutions. Remember the Bank of England trying to defend the Pound in 1992? Despite their reputation and size, the market force was against them. Eventually, even the Bank of England capitulated.
What chance does the smaller individual trader have in forcing the market to move just because he is in a trade? The chance is like finding ice in a hot desert. The best approach is to think of harmonizing with the market - like in Aikido. Knowing the Perspective allows me to be with the Force. My entry is when the counter-attack (the correction) is likely to end, and where I assess the main Force is likely to resume.
Knowing my capital is relatively very small compared to the market ensures I only engage in high probability low-risk trades, and that I manage drawdown very carefully, and become aggressively adventurous when equity grows positively.
I will now look at the ten specific trade triggers I use.
The Turtle Soup setup was codified and named by Lawrence Conner and Linda Bradford Raschke in their book Street Smarts; High Probability Short Term Trading Strategies.
Essentially, this is a setup that is backed by the trading statistics of the Turtle Trades. It is beyond the scope of this article to tell the impressive story of how the Turtles as a group were created. Readers who wish to find out more about the Turtle Traders can read Market Wizards by Jack D. Schwager. The Turtle Trades employ a breakout strategy. Looking to buy upside breakouts and sell downside breakouts in the expectation the next impulsive move should accelerate after the congestion or rest phase defined by a sideway trend. This strategy has rewarded the Turtles with significant, consistent and profitable returns over time. But statistically the Turtles have a relatively low hit rate of approximately 30%. This means statistically 70% of breakouts are false, and the market remains in range bound action - moving from the sideway high to sideway low and rotating back and forth from the sideway boundaries. This type of market action has been identified by Wyckoff as the up thrust and the spring. Personally, I like the Turtle Soup moniker, as I can visualize the Turtles becoming Soup when they take a loss!
In my version of the Turtle Soup setup, I will initiate the trade only in the direction of the higher timeframe direction. So in an uptrend of my trader’s timeframe, I need the market to enter a sideway range as defined by the Barros Swing, in either my timeframe or one timeframe lower. For myself, my trading timeframe is based on the 18D Barros Swing. Ray defines this as the trend of the monthly timeframe. I can accept either 18D or 5D sideway range to setup the Turtle Soup trade. I then await a downside breakout of the sideway swing action, and validate this zone by checking if the Stochastic is at over-sold zone. This is the setup I need to see. The actual buy-trigger is a bullish candle that closes inside the original sideway zone. This implies the attempted downside break is a false break that is likely to expand the sideway range marginally.
Obviously, in a downtrend, I will be hunting for a Turtle Soup setup to initiate a sell trade. The market must be in a downtrend and ranges in either the 18D or 5D Barros Swing, then attempting an upside breakout, which fails by closing inside the sideway range. (See Turtle Soup chart examples in the chart annex)
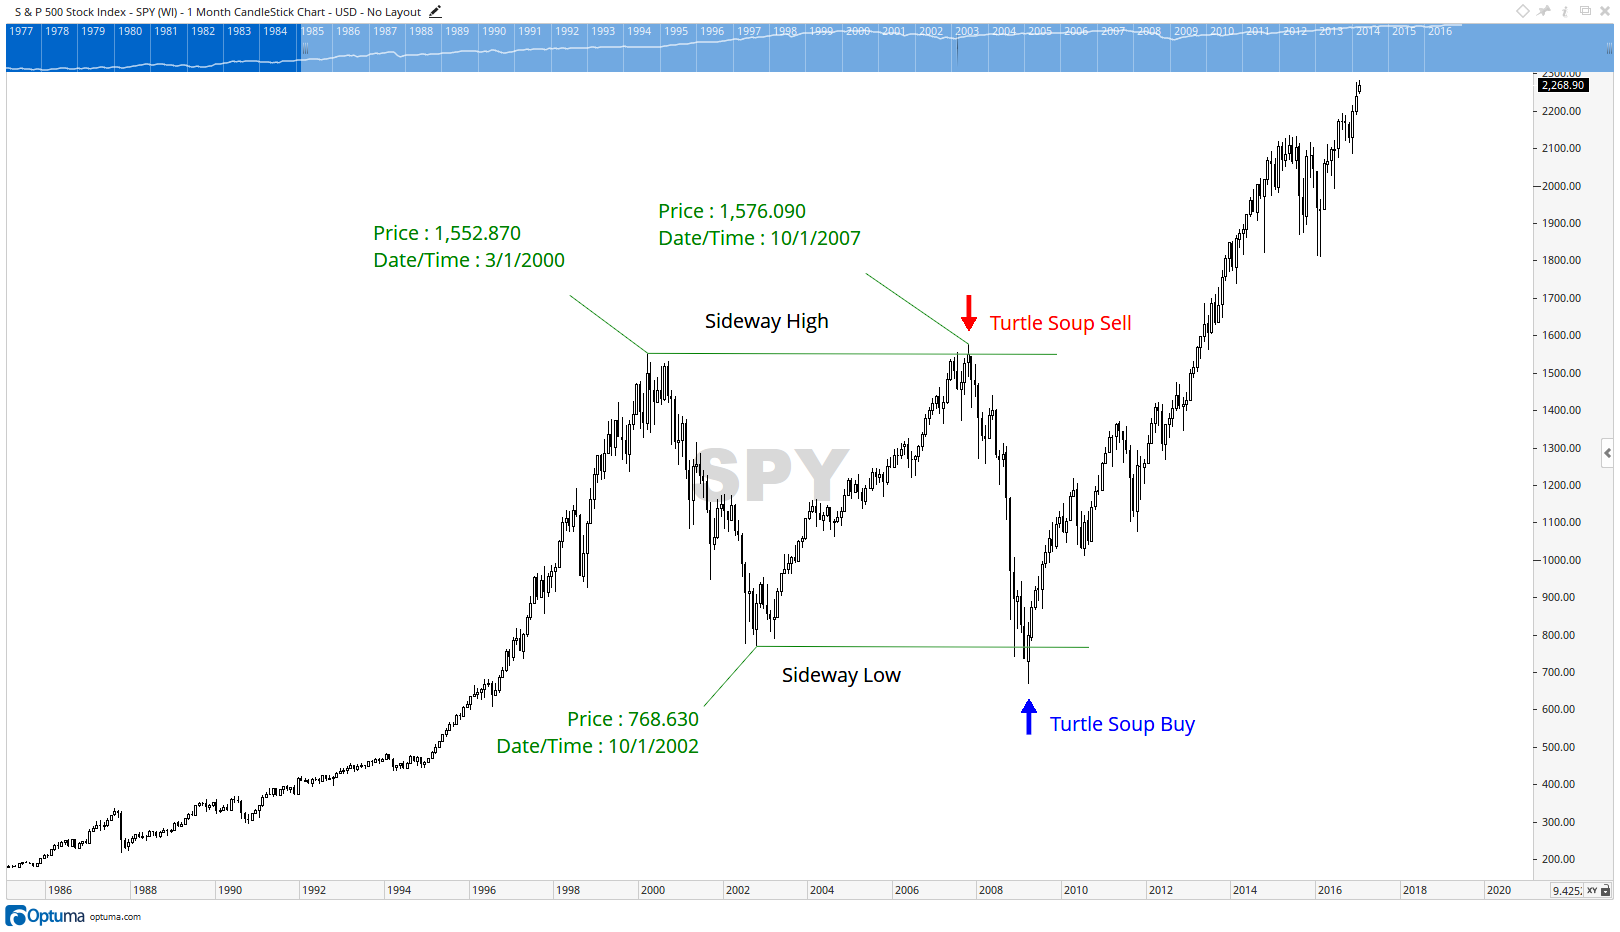 S&P500
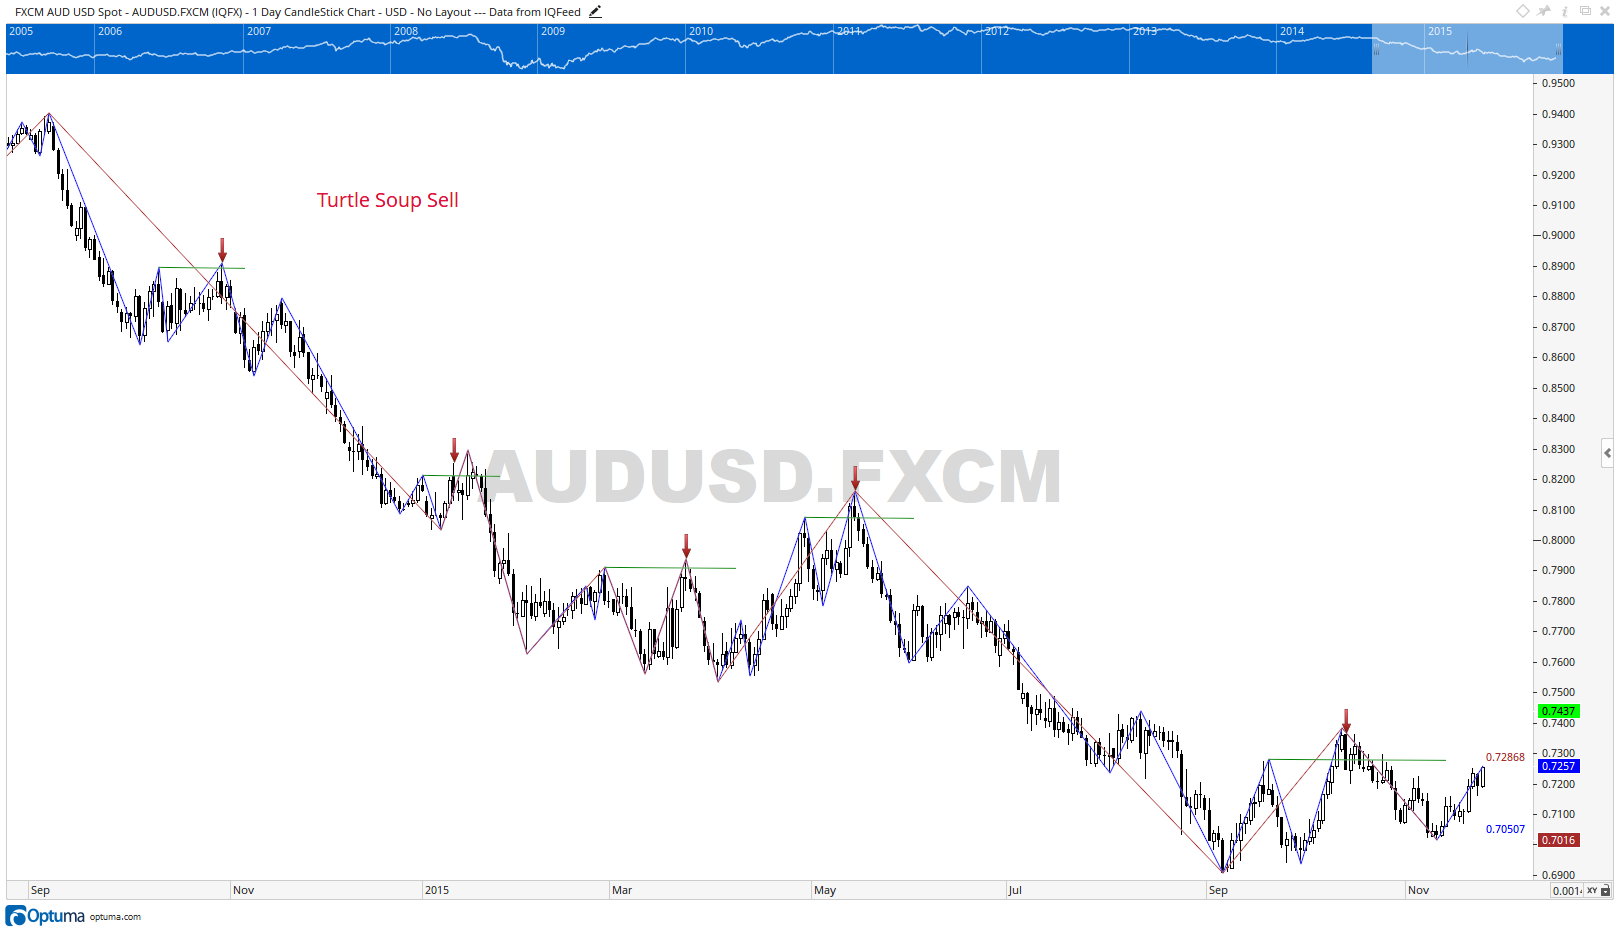 AUDUSD
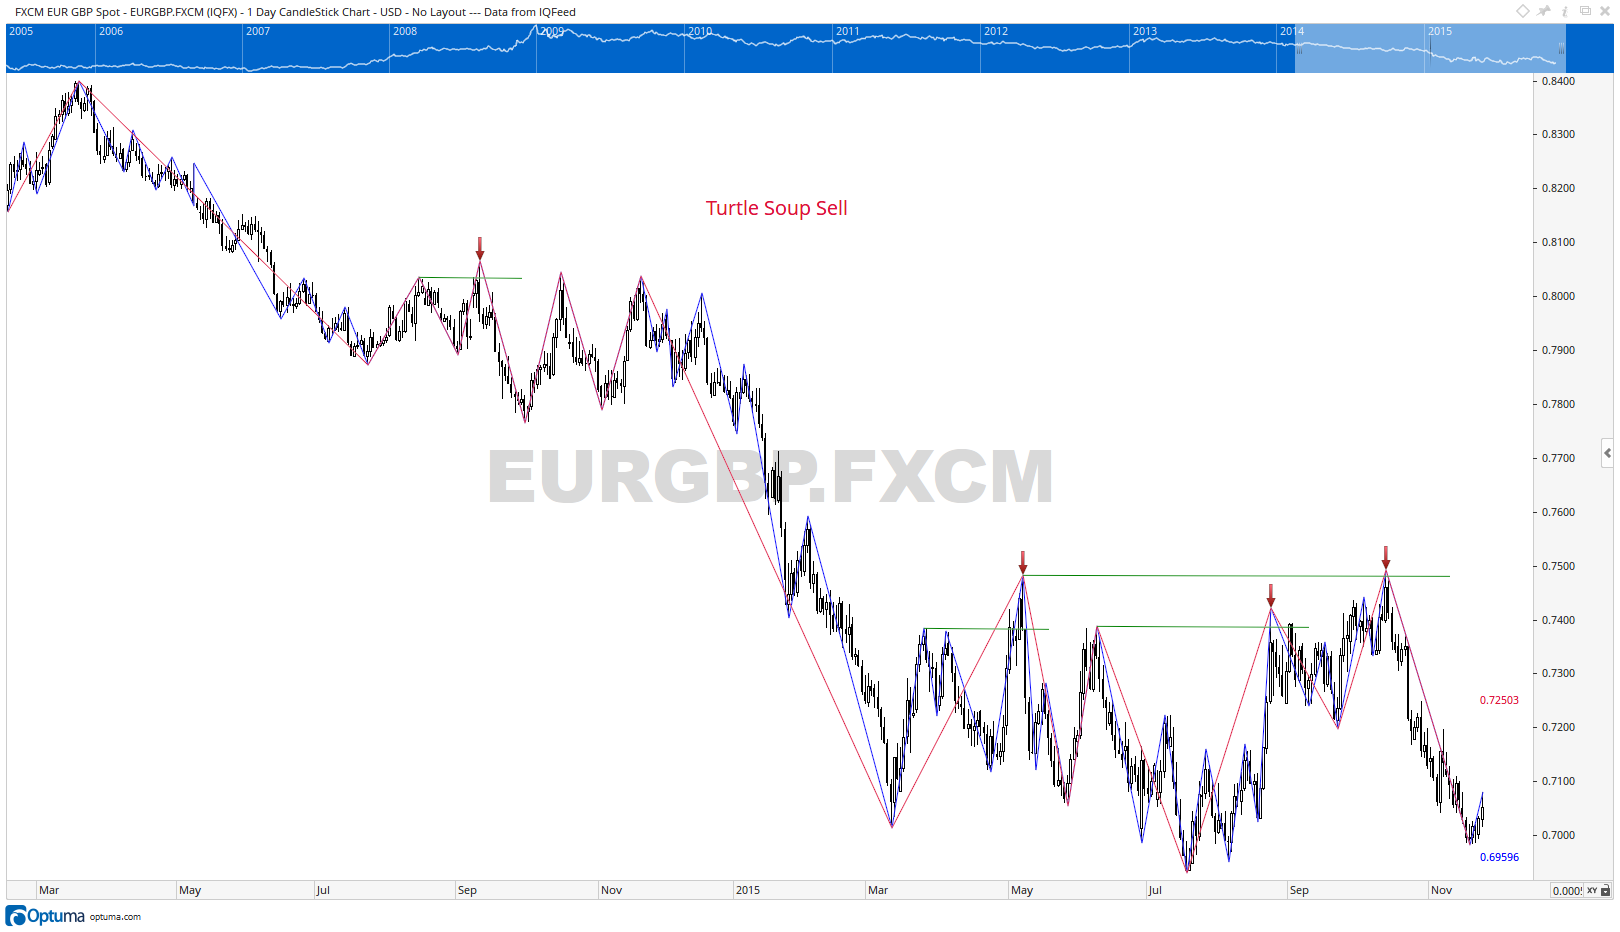 EURGBP
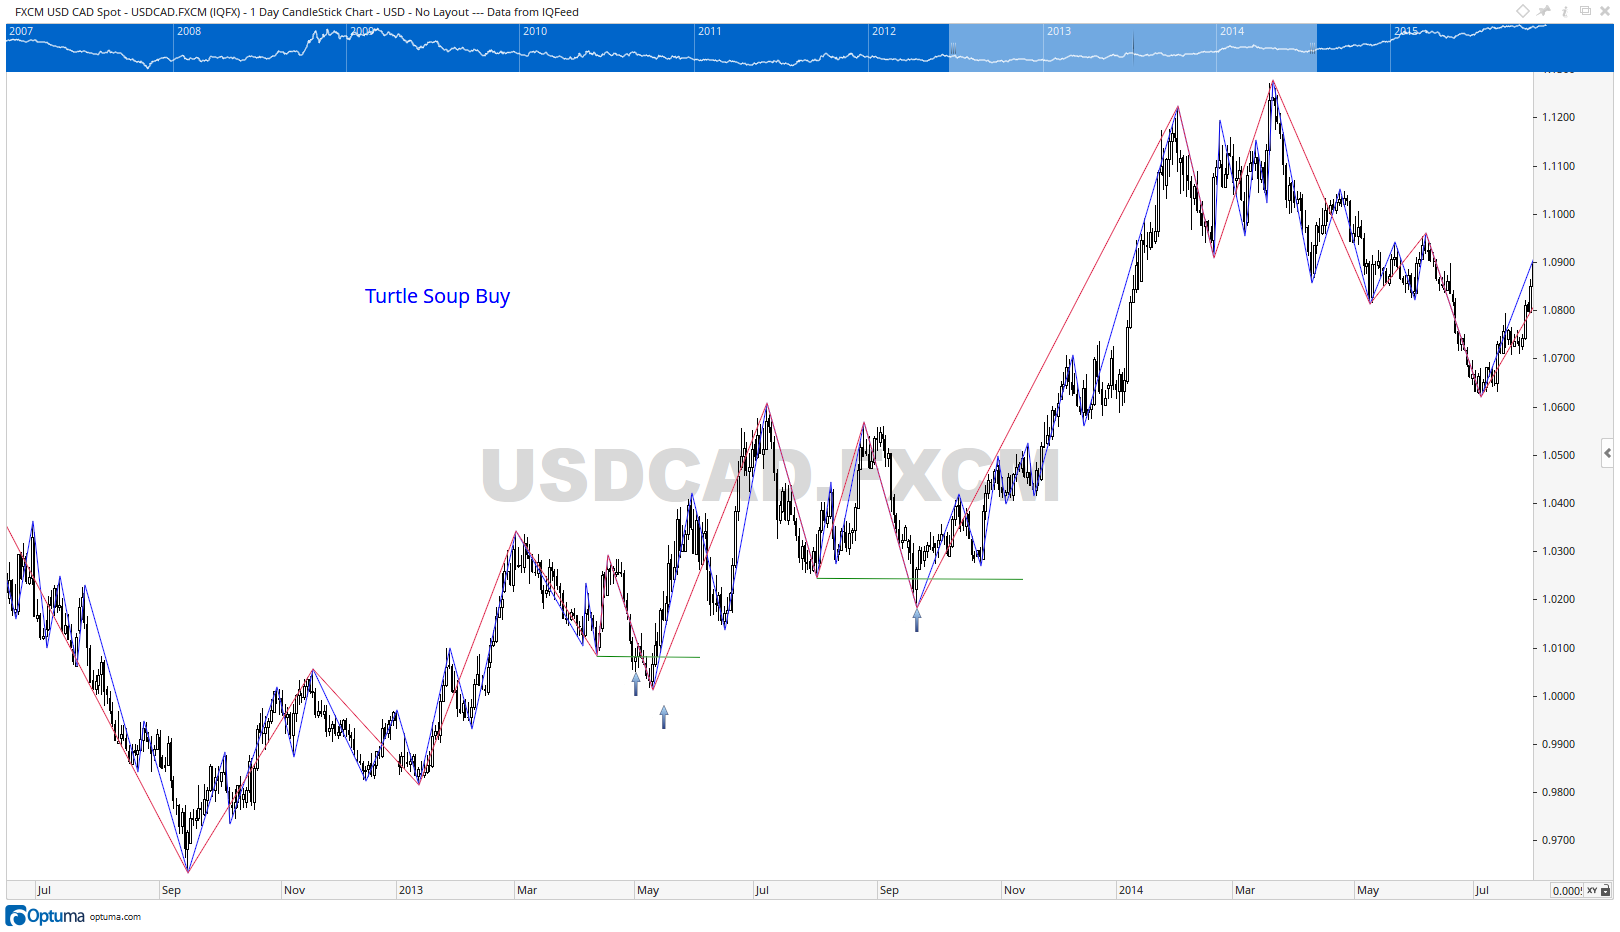 USDCAD
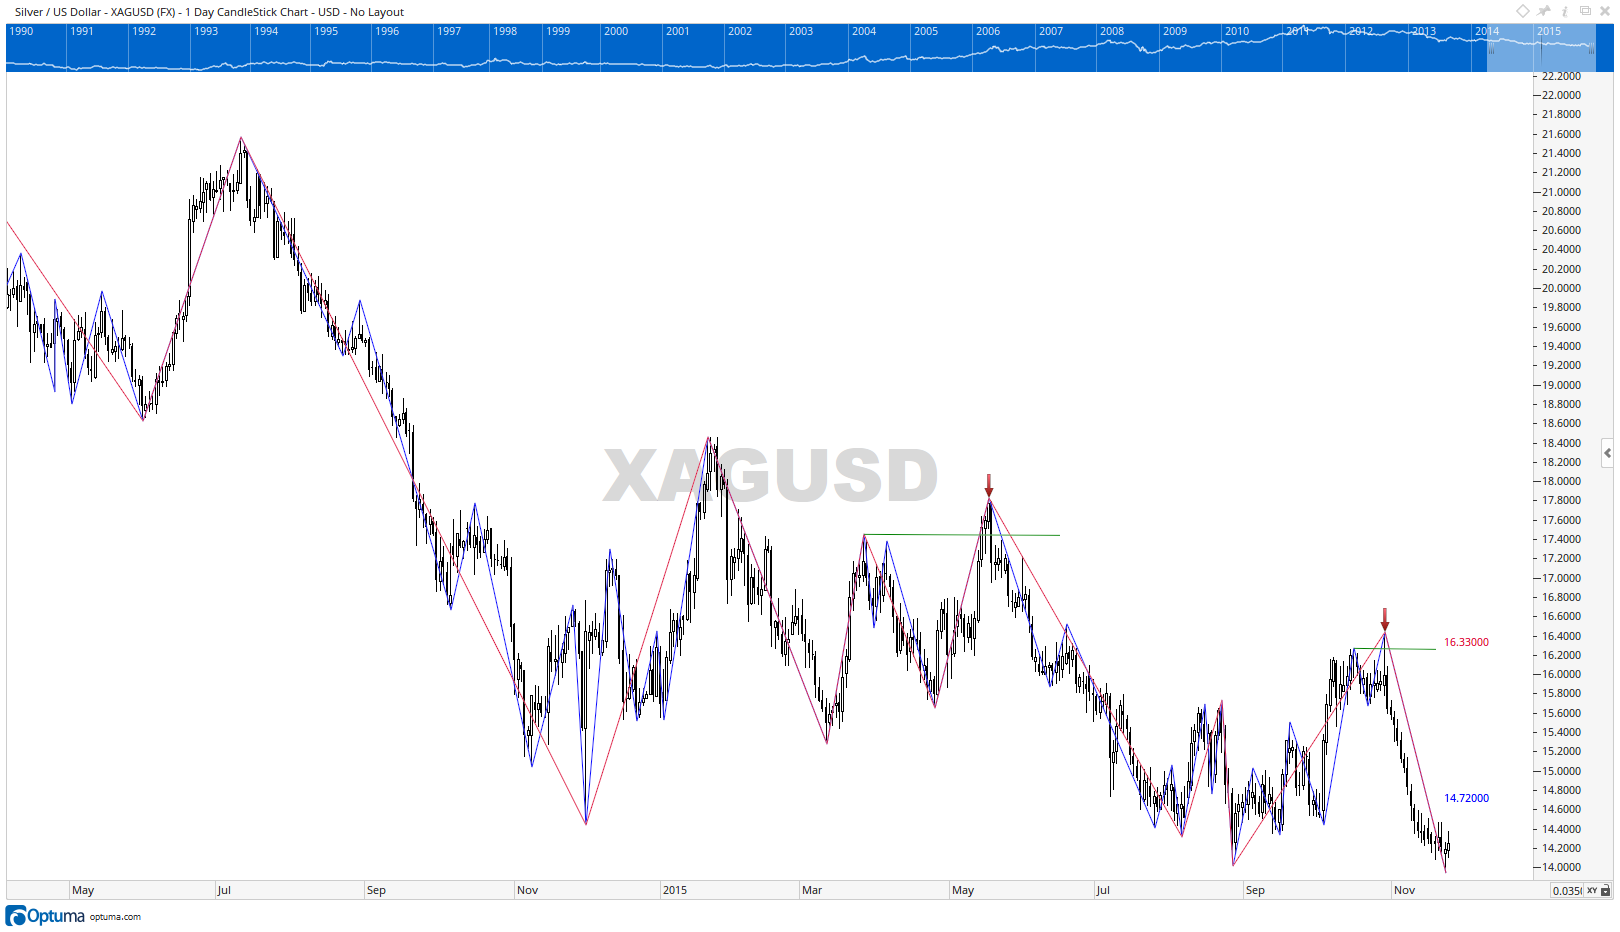 XADUSG
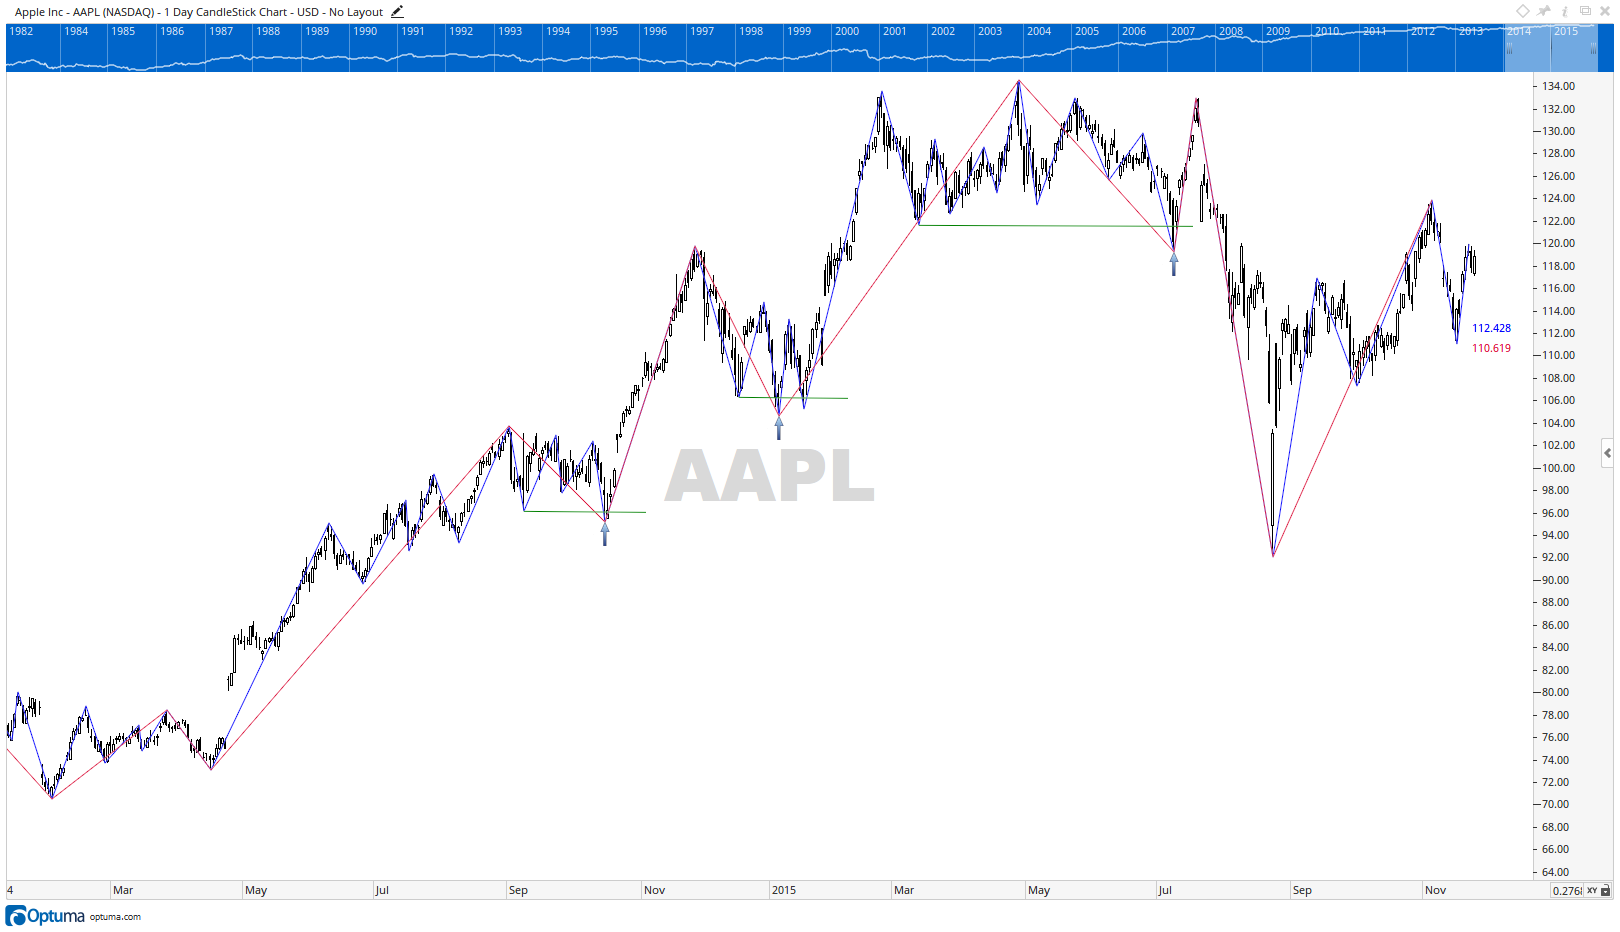 AAPL
AAPL
Although the Turtle soup setup gives me the highest probability trade entry, it does not occur as often as I would like.
I use these six Japanese Candlestick patterns to trigger my trade entries as standalone triggers. If they occur as part of the Turtle Soup setup, my confidence level in the validity of the signal will rise. These six Japanese candlestick patterns have specific names and have been discussed in many books dealing with Japanese Candlesticks. Readers may wish to consult Steve Nison’s excellent book, Beyond Candlesticks: New Japanese Charting Techniques Revealed, published by Wiley in 1994. I will describe these six Japanese Candlestick patterns in three sets of two patterns each because the patterns are the same in its nature. One triggers a buy trade, and the other triggers a sell trade.
It will be appropriate for me to define how candlesticks were originally drawn, and what I consider to be bullish candles and bearish candles.
Traditionally, Japanese candlesticks were drawn with black ink on white paper. Bearish candles contained filled in black candle real bodies and were originally called Black Candles. Bullish candles had the body outlined in ink, but were not filled in. They were originally called White Candles.
A bullish candle must have a relatively large white real body, opening near the candle’s low and closing near the candle’s high. Obviously, a bearish candle must have a relatively large black real body, opening near the candle’s high and closing near the candle’s low.
In addition, these candles must be of normal size. Normal size is as defined by the ATR (I use the 60 period as my setting for ATR). This is because the distance traveled from the high to the low, or vice versa, represents the strength and intensity of the force creating that particular candle
The Hammer candle has a small real body that closes within the upper 33% of the candle’s high-low range. It must have a long shadow (from the bottom of the real body to the candle’s low). The Hammer candle’s range must be at least of normal size. Obviously, if the real small body is closer to the candle’s high, clearer is the trigger to buy. If the candlestick’s shadow is very long, it would suggest sellers were strongly repelled by the end of that trading session and the market is potentially changing direction from down to up. Using a Martial Arts analogy, sellers push prices 5 paces down, but a strong counter-attack by buyers reclaimed the 5 paces won initially by the selling bears. The Hammer is so named because the Japanese technical analysts of that period consider this action as that of the market Hammering Out A Bottom. (See illustration of Hammers in the chart annex)
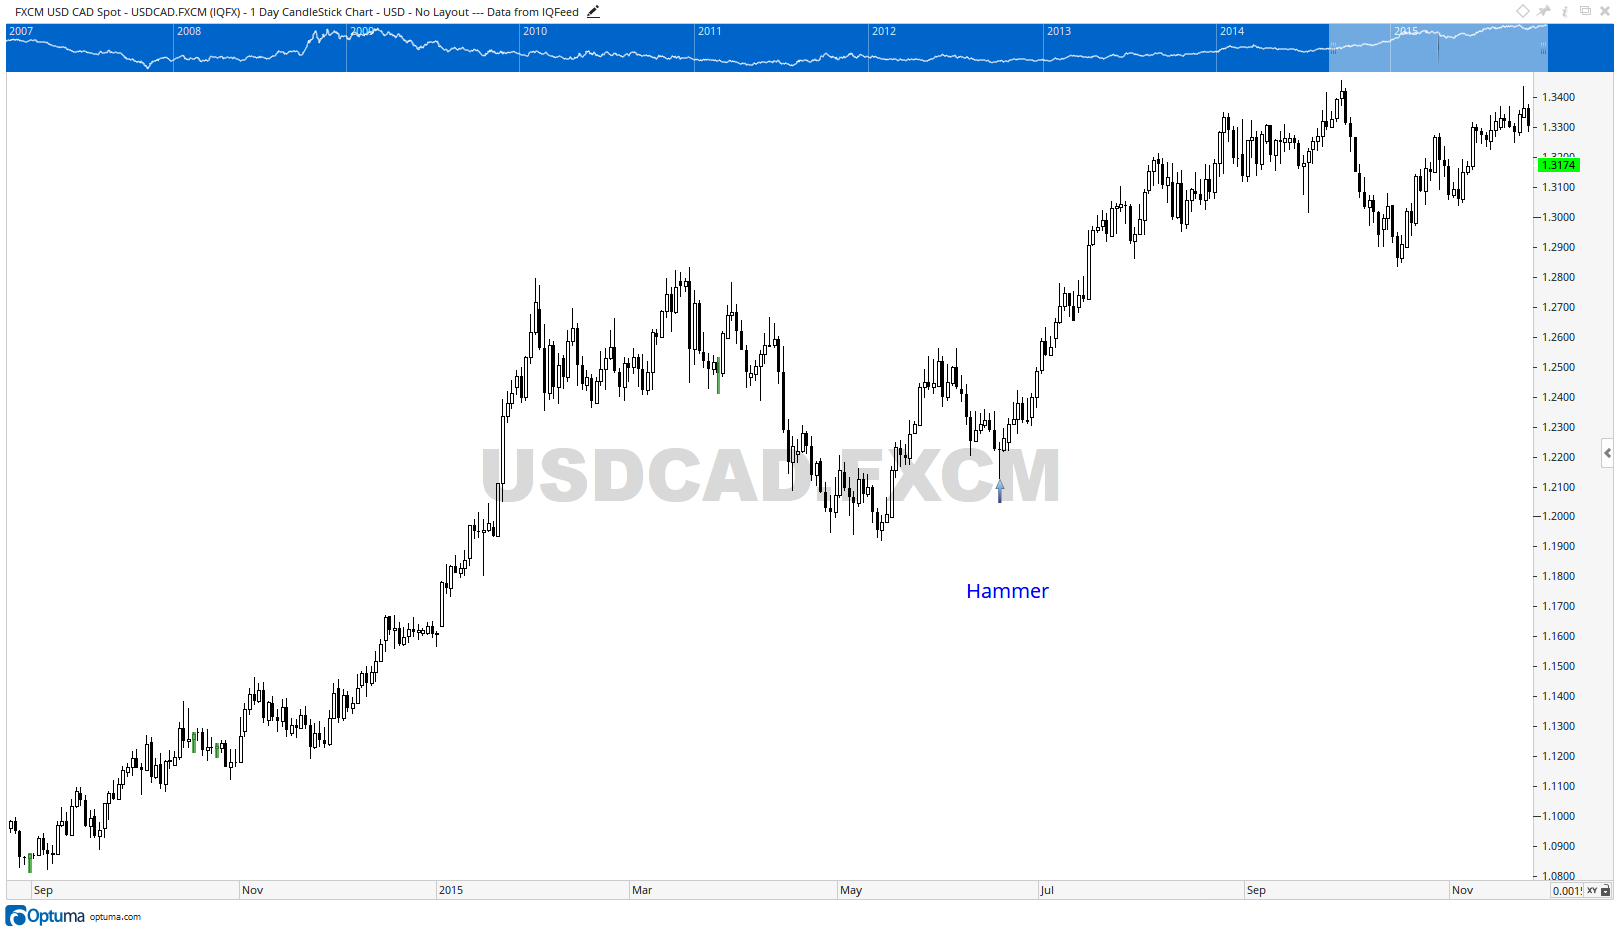 Hammers
The Shooting Star candle has a small real body that closes within the lower 33% of the candle’s high-low range. It must have a long shadow from the top of the real body to the candle’s high. The Shooting Star candle’s range must be at least of normal size Obviously, if the real small body is closer to the candle’s low, clearer is the trigger to sell. If the candlestick’s shadow is very long, it would suggest buyers were strongly repelled by the end of that trading session and the market is potentially changing direction from up to down. Using a Martial Arts analogy, buyers push prices 5 paces up, but a strong counter-attack by sellers reclaimed the 5 paces won initially by the buying bulls. The Shooting Star is so named because the Japanese technical analysts of that period compare this action to the Shooting Stars seen falling to earth in the night sky. (See illustration of Shooting Stars in the chart annex)
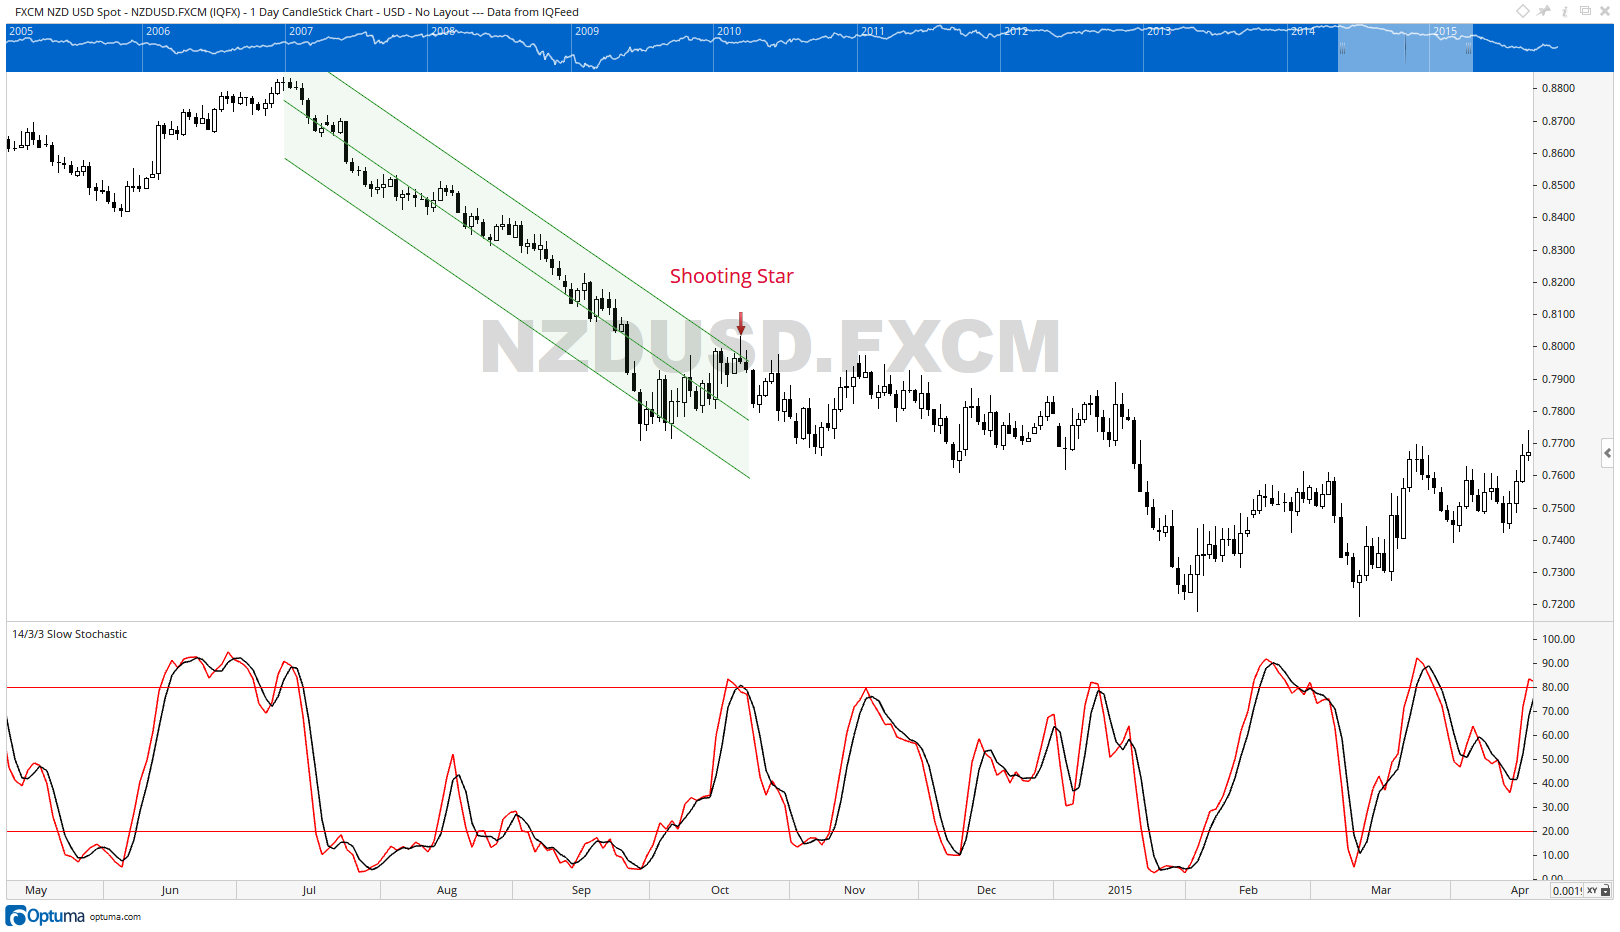 Shooting Stars
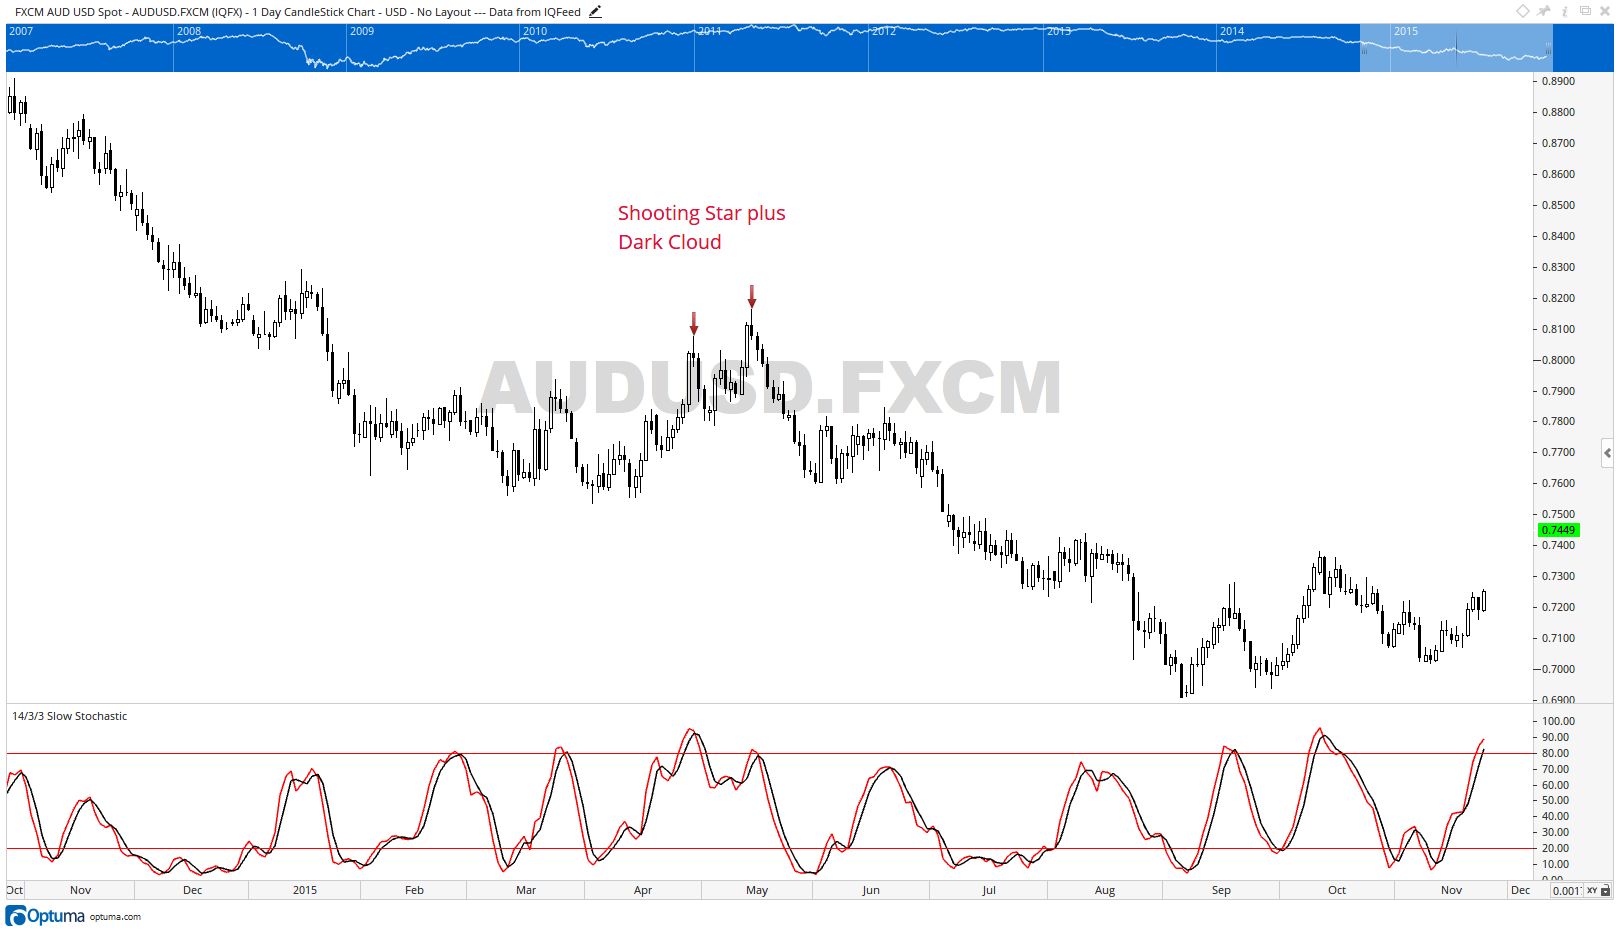 Shooting Stars
The Piercing Candle is a two candle pattern. I will describe this pattern based on the end of day chart. Readers can, of course, use and define the candles to suit their trading timeframe. The principles remain the same.
The first candle that forms the Piercing Candle pattern must be a bearish candle and the market closes with negative dark despondency. On the next trade day, a bullish candle of normal size pierces partially into the previous day’s bearish body. To me the analogy is clear; a ray of white light is piercing into the black darkness and signals the potential start of an upward move in the market (see illustration of Piercing Candles in the chart annex)
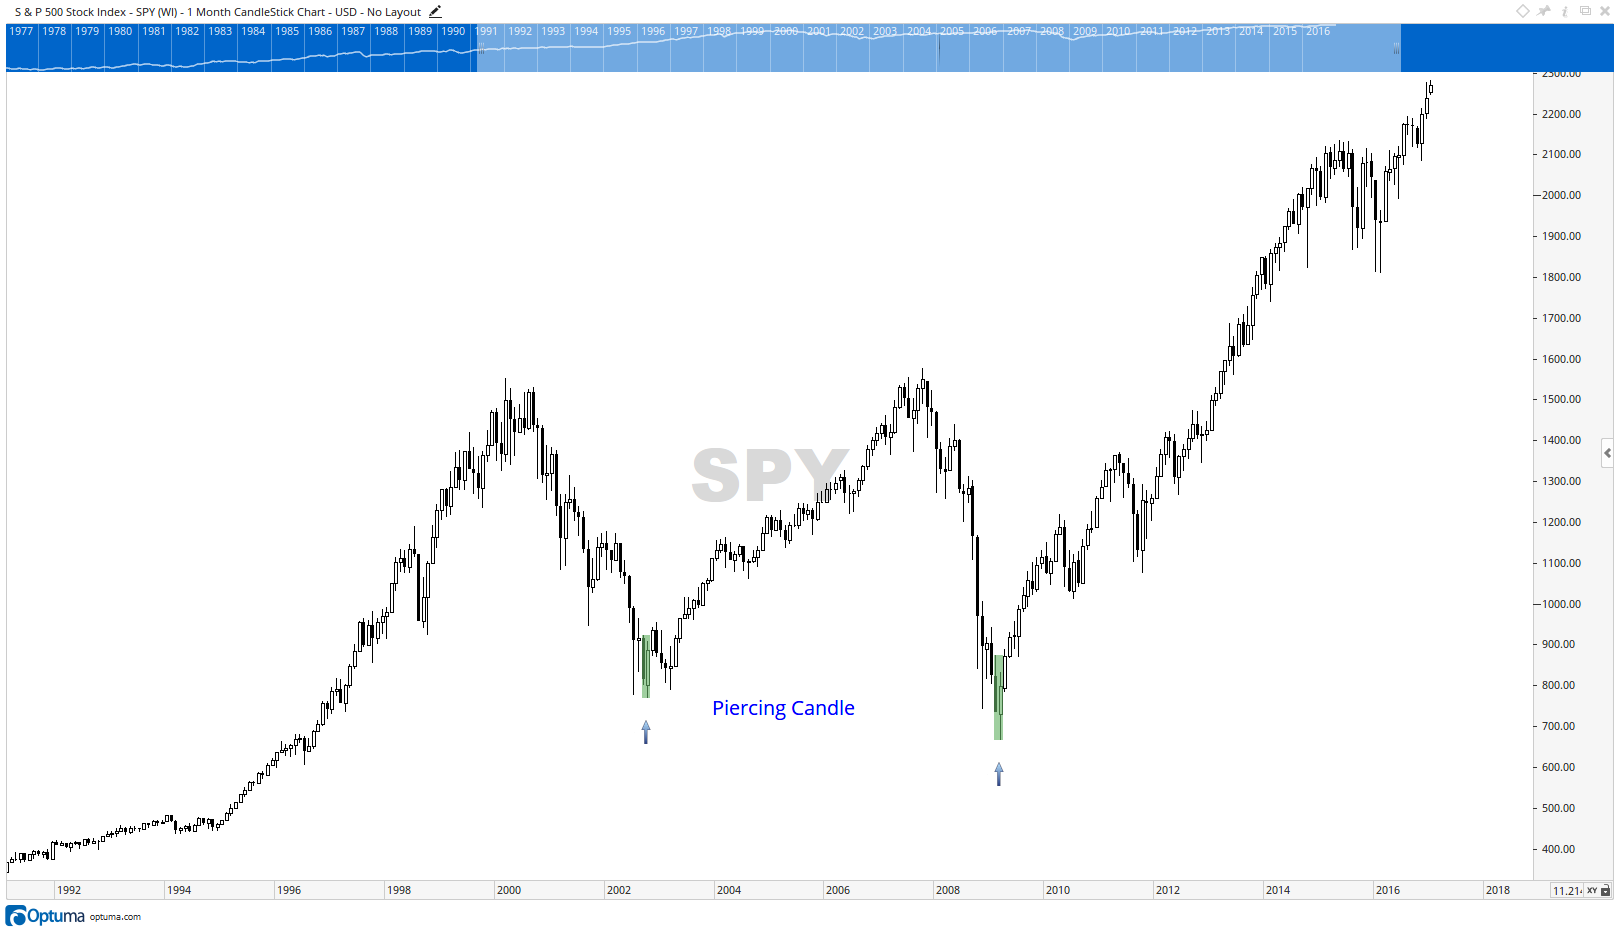 Piercing Candle
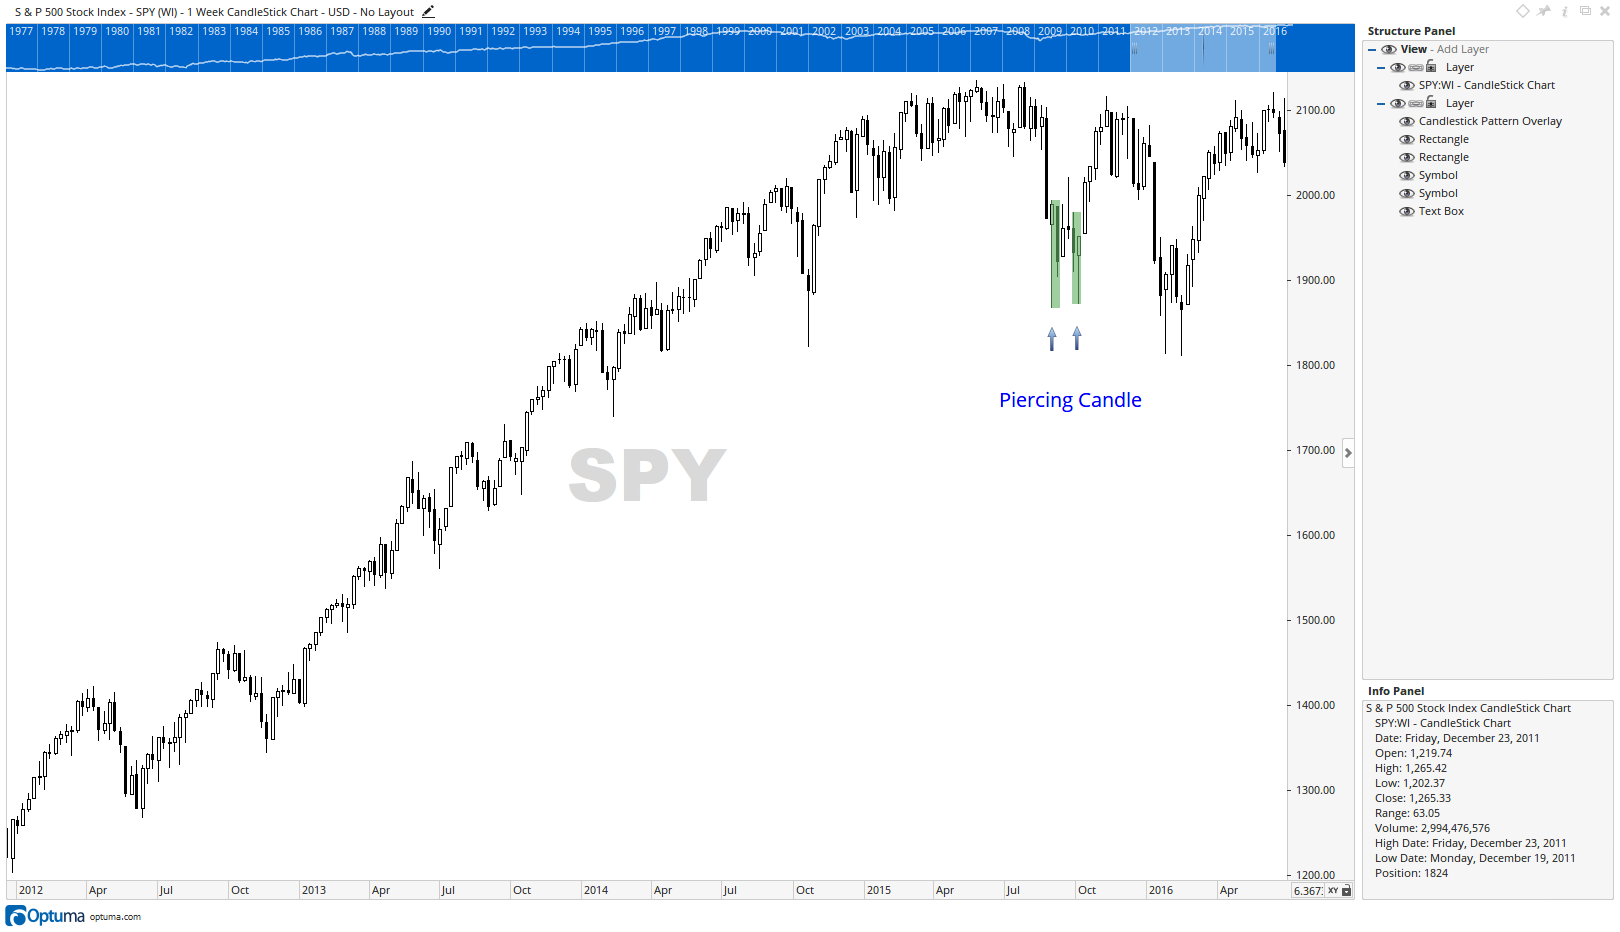 Piercing Candle
The Dark Cloud is a two candle pattern. I will describe this pattern based on the end of day chart. Readers can, of course, use and define the candles to suit their trading timeframe. The principles remain the same.
The first candle that forms the Dark Cloud pattern must be a bullish candle and the market closes with positive, white vibrancy. On the next trade day, a bearish candle of normal size partially enters into the previous day’s bullish body. To me the analogy is clear; a black dark cloud is partially covering the previous happy white vibrant day and signals the potential start of a stormy period for the market (see illustration of Dark Clouds in the chart annex)
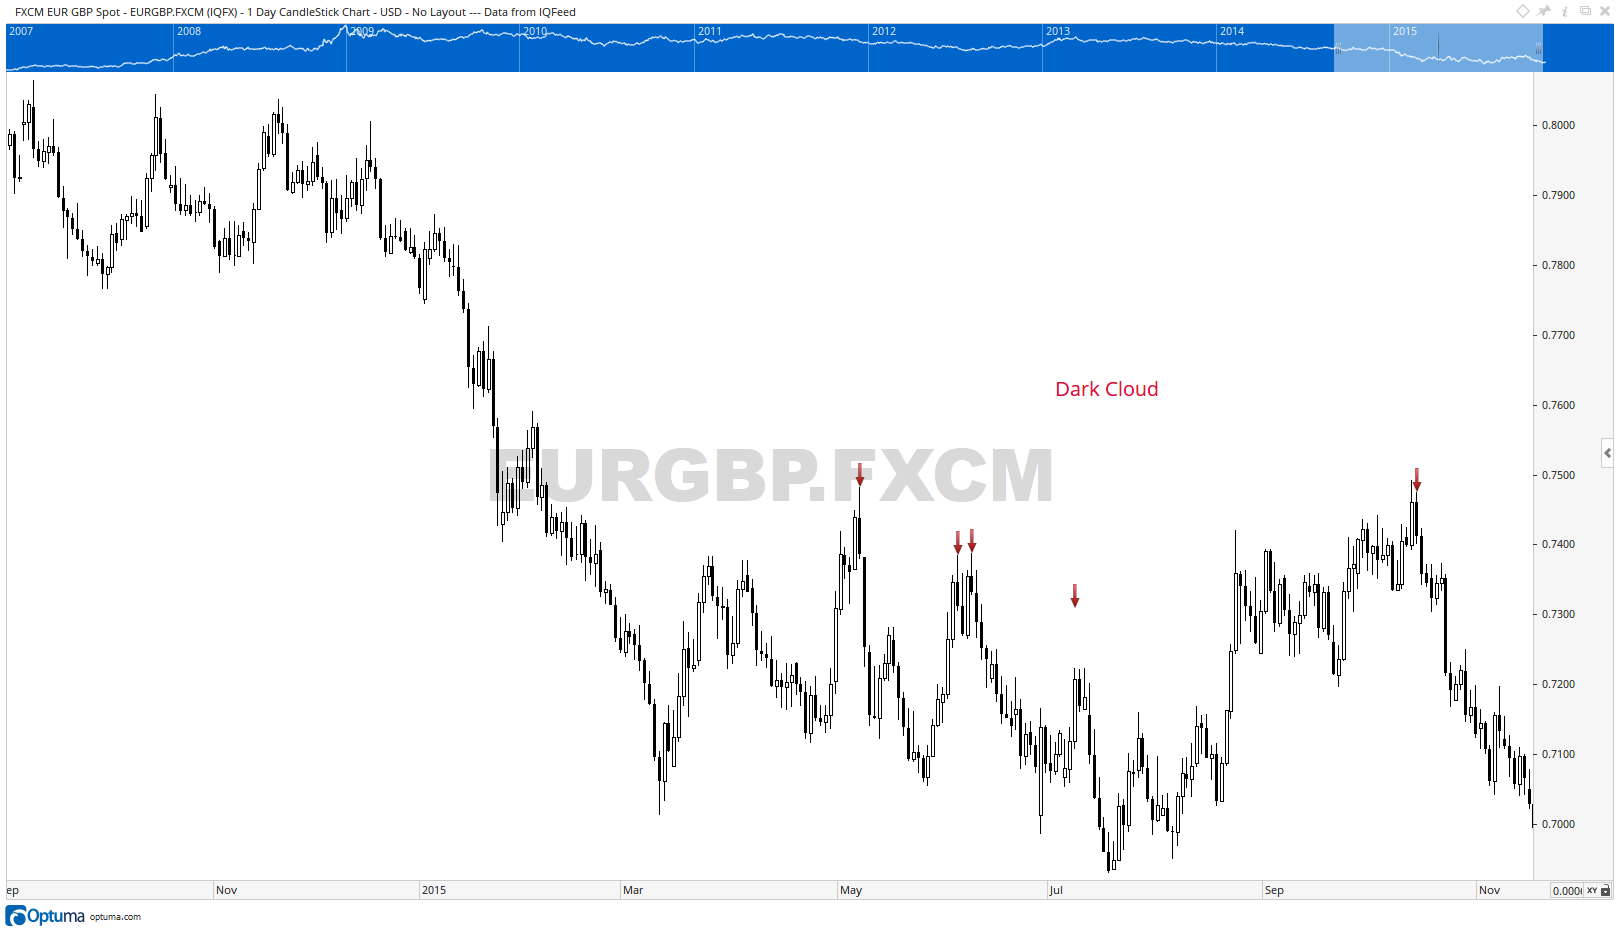 Dark Clouds
The Bullish Engulfing Candle is also a two candle pattern. The first day of this pattern must be a bearish candle. The second trigger day must be a bullish candle that engulfs the previous day’s entire high/low range. In traditional Candlestick definition, the white body of the trigger day must engulf the entire previous day’s candle. In today’s context - especially with 24 hr markets - gaps are rare, so engulfing candles are also rare. I will accept an engulfing body, where the white real body engulfs the previous day’s black body, or where the trigger day’s range engulfs the previous day’s range. (See illustration of Bullish Engulfing Candles in the chart annex)
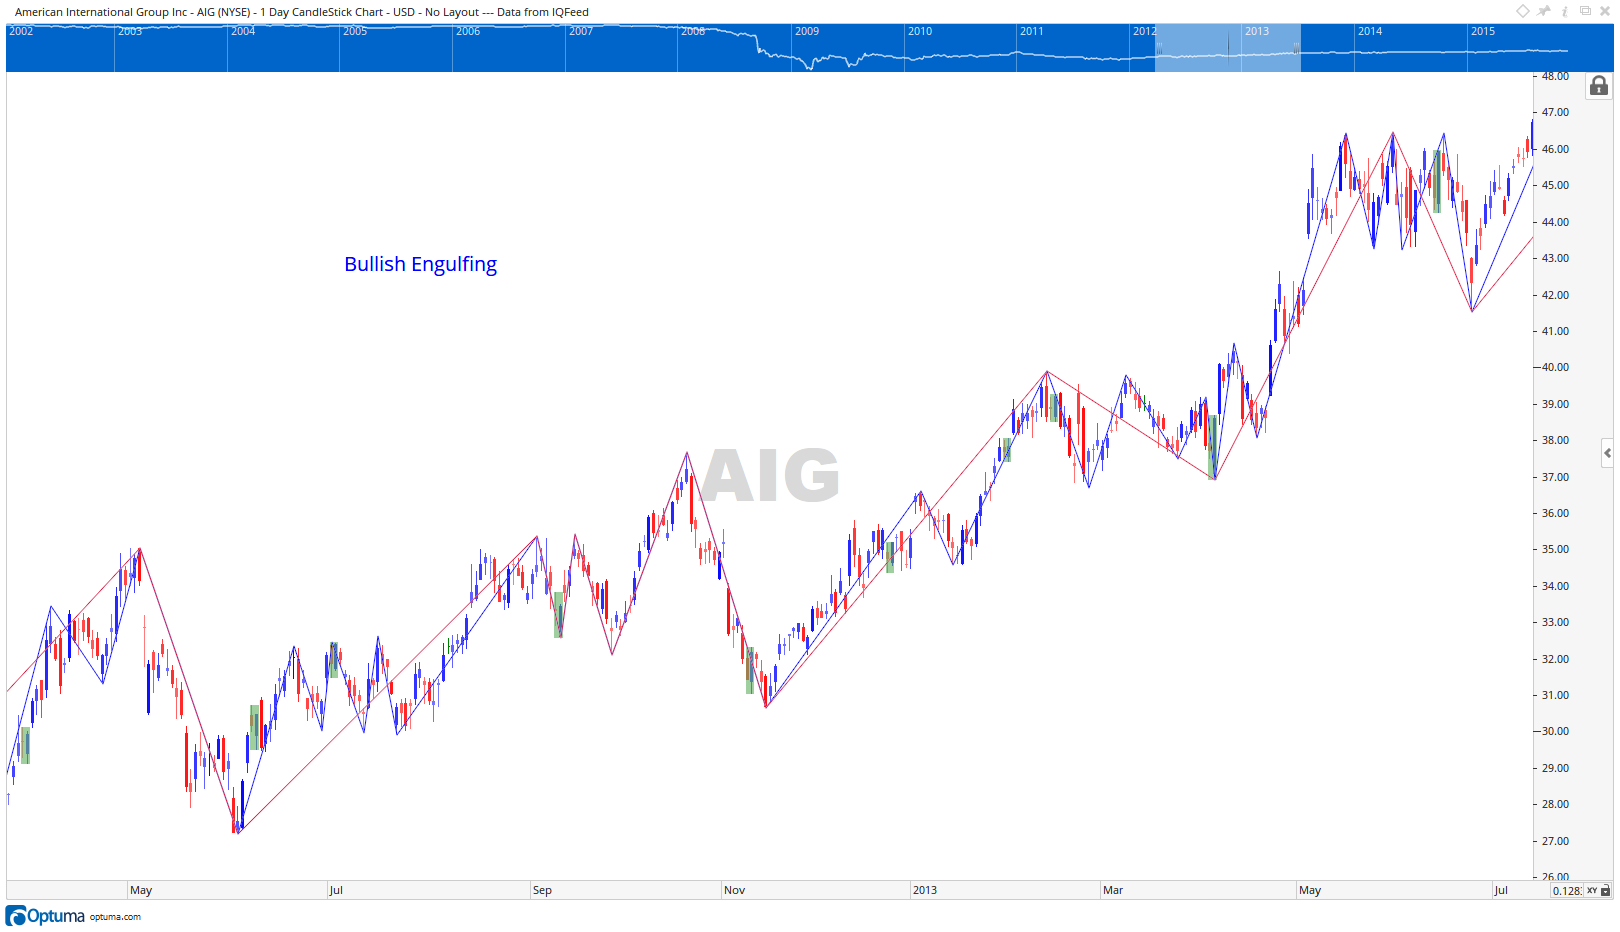 Bullish Engulfing Candles
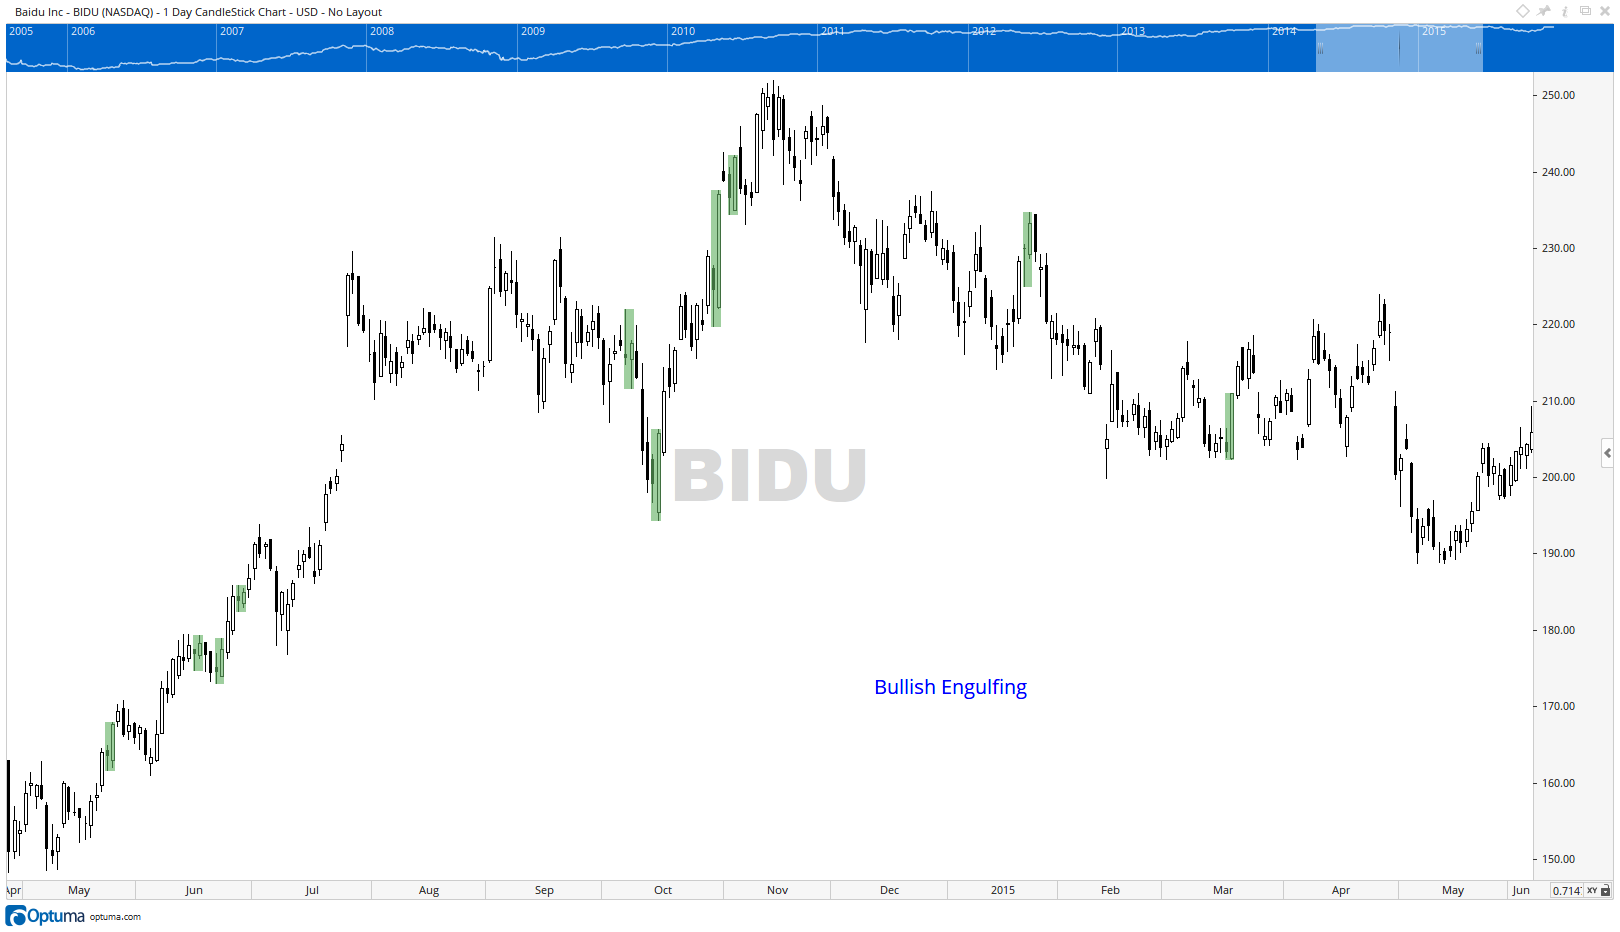 Bullish Engulfing Candles
The Bearish Engulfing Candle is also a two candle pattern. The first day of this pattern must be a bullish candle. The second trigger day must be a bearish candle that engulfs the previous day’s entire high/low range. In traditional Candlestick definition, the black body of the trigger day must engulf the entire previous day’s candle. In today’s context - especially with 24 hr markets - gaps are rare, so engulfing candles are also rare. I will accept an engulfing body, where the white real body engulfs the previous day’s black body, or where the trigger day’s range engulfs the previous day’s range. (See illustration of Bearish Engulfing Candles in the chart annex)
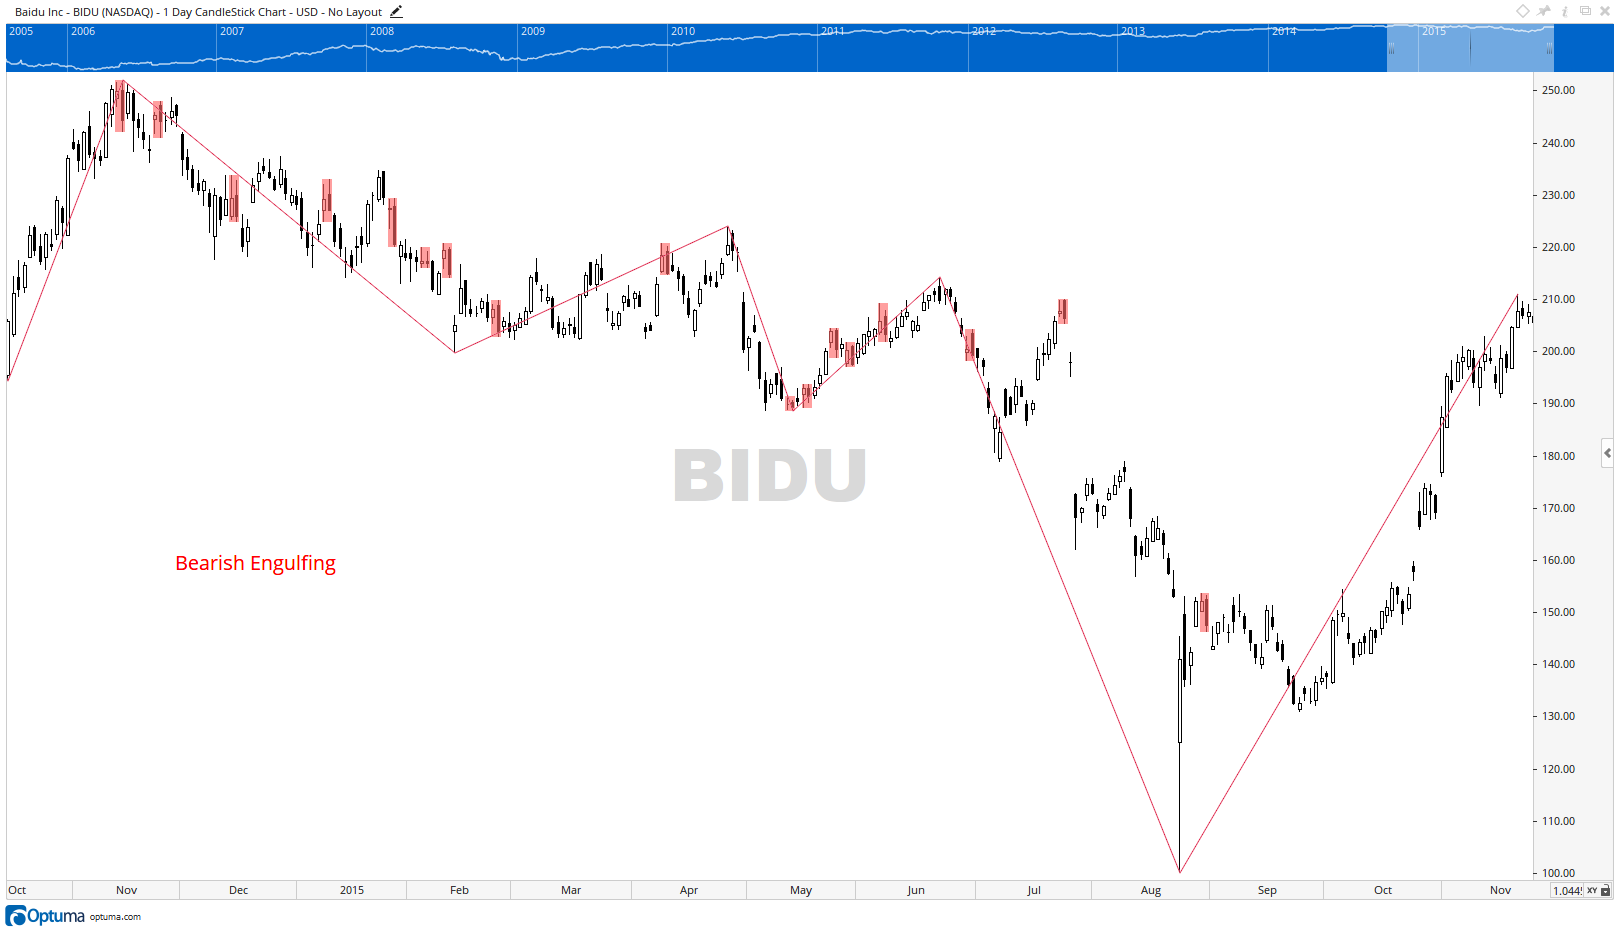 Bearish Engulfing Candles
I am quite certain some readers will be searching the internet for American Candlesticks, and are likely to be disappointed by Google directing them to view brass or glass instruments that hold actual candles for lighting purposes.
There is a local Singapore story about how American Candlesticks, as used in Technical Analysis, came to be named. In 1998, Dow Jones Telerate (live data vendors and resellers of the TradeStation charting software) invited Thomas DeMark Junior to Singapore. I was fortunate to have been nominated by my then employer as the company’s representative to the Demark one day seminar.
Mr. DeMark Junior showcased a short-term trading methodology. It was based on a comprehensive set of rules. It reminded me of the rules used in Japanese candlestick charting. The group of attendees I was with collectively and cheekily renamed the Demark set of short-term trading triggers as ‘American Candlesticks’ - precisely because these rules were devised by the very American Mr. Thomas DeMark Senior. You may want to read DeMark Indicators, written by Jason Perl. This book is authorized by Thomas Demark Senior, and is published by Wiley Press. In this book these three “American Candlesticks” are discussed in detail.
Here are the three American setups I use:
What I am looking for is the zone where I expect the correction to end, so I have the stochastic oscillator in oversold, or undervalued zone. The market must have dipped to reflect the stochastic in oversold zone, and the market is now potentially ready to run up strongly. Therefore TD Camouflage buy setup triggers my trade at (or just before) the end of the day.
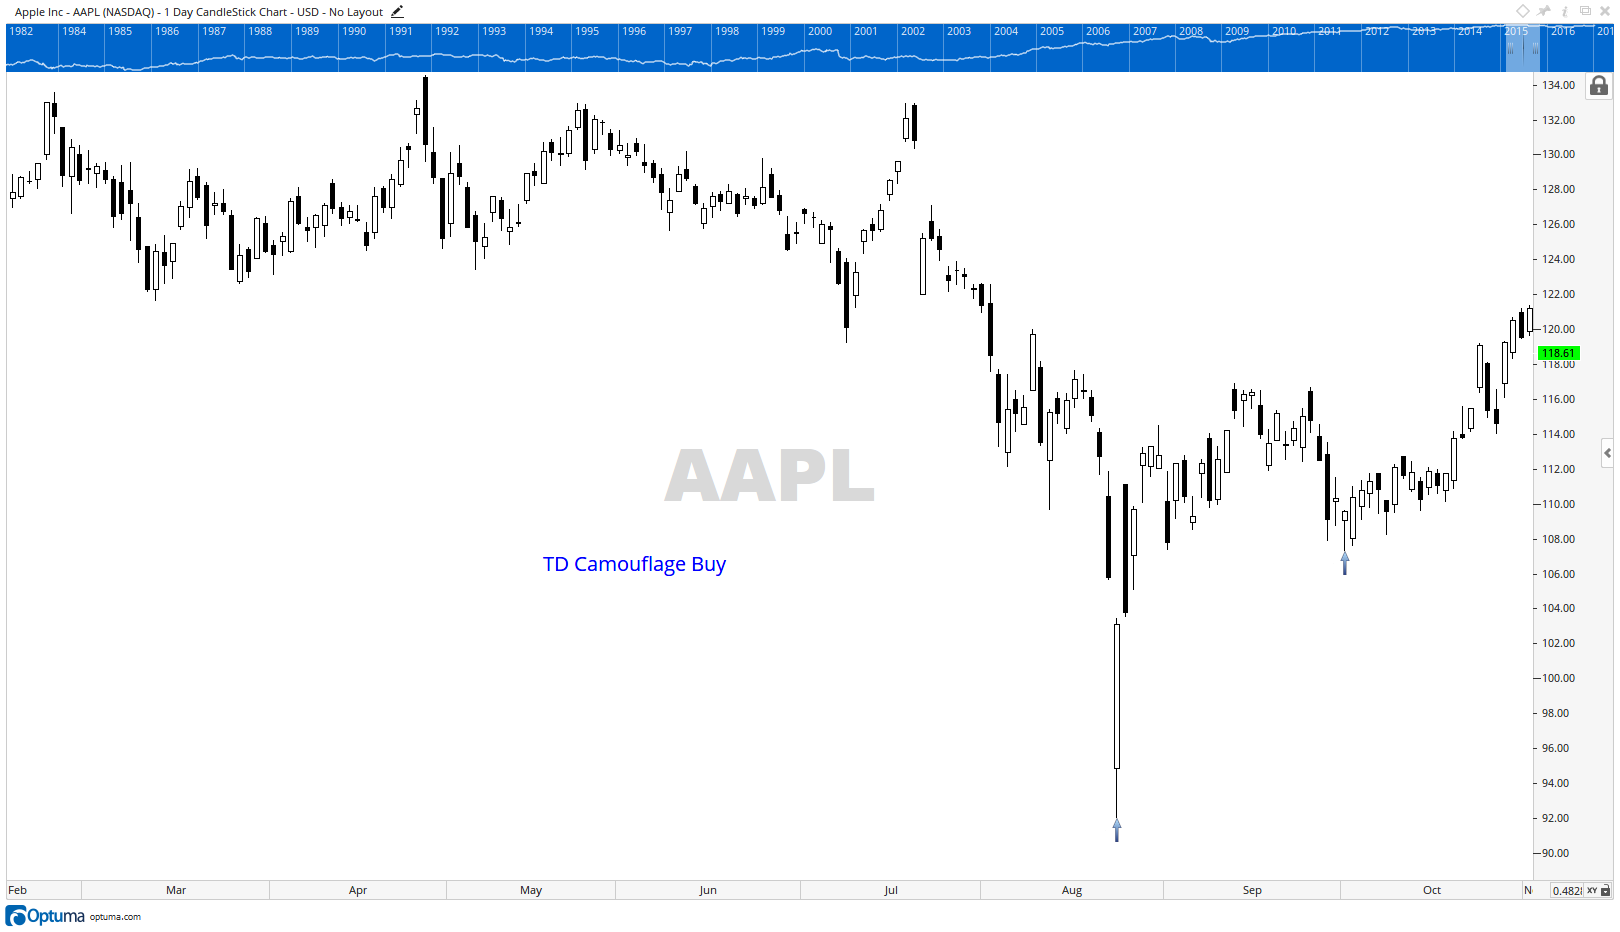 TD Camouflage Buy
What I am looking for is the zone where I expect the correction to end, so I have the stochastic oscillator in overbought, or overvalued zone. The market must have rallied to reflect the stochastic in overbought zone, and the market is now ready to start its next down impulse. Therefore TD Camouflage sell setup triggers my trade at (or just before) the end of the day.
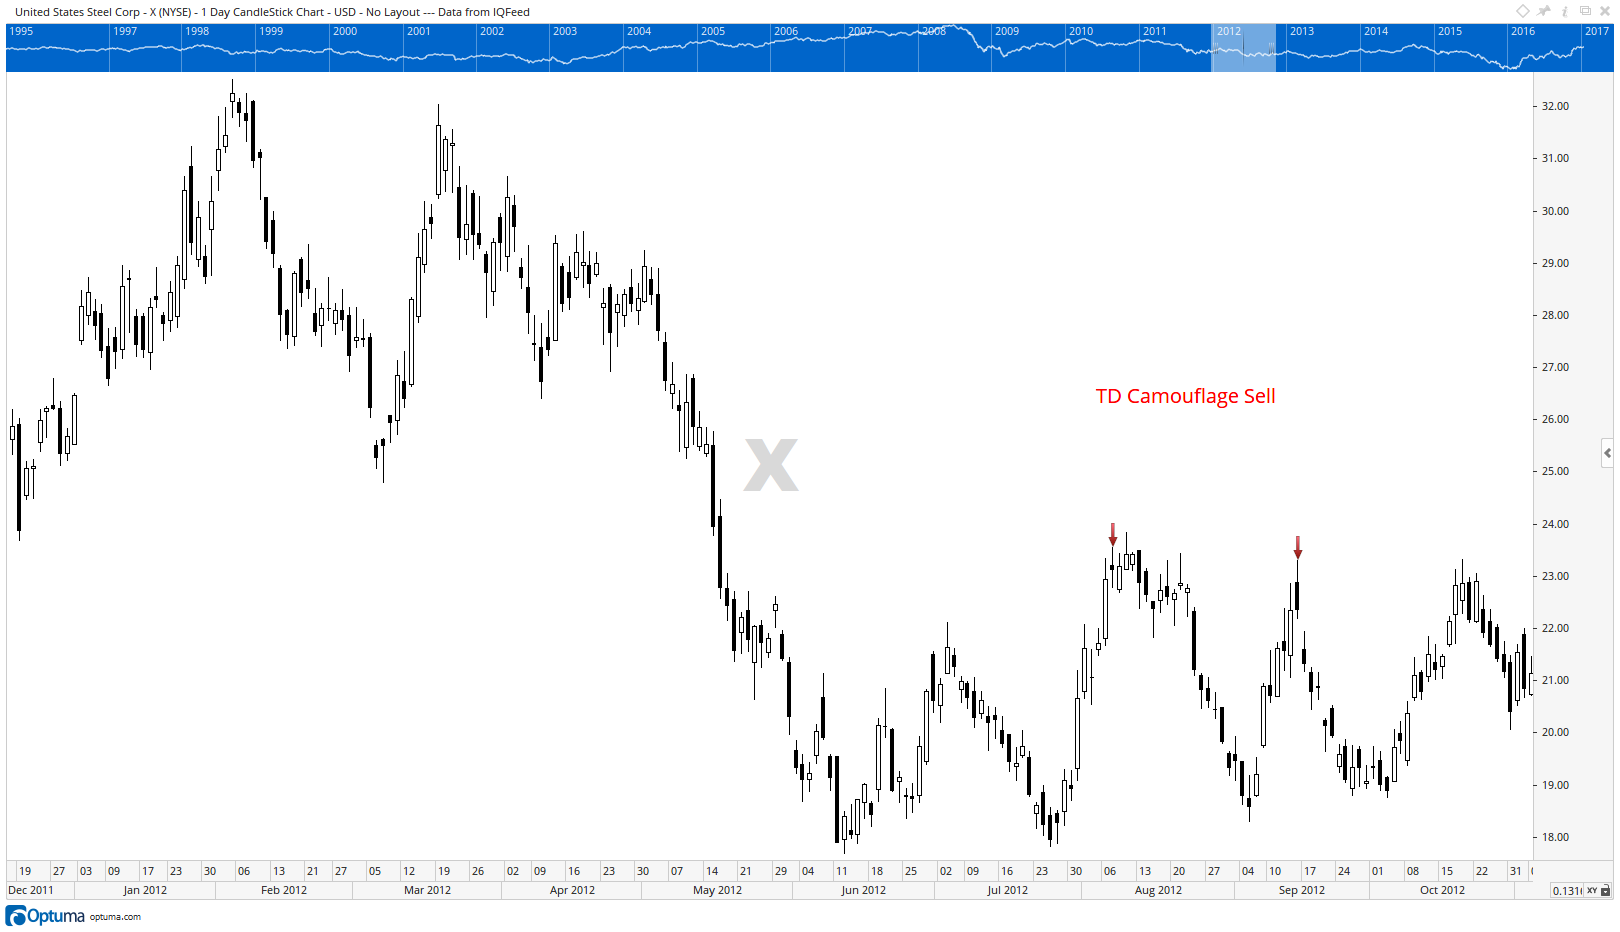 TD Camouflage Sell
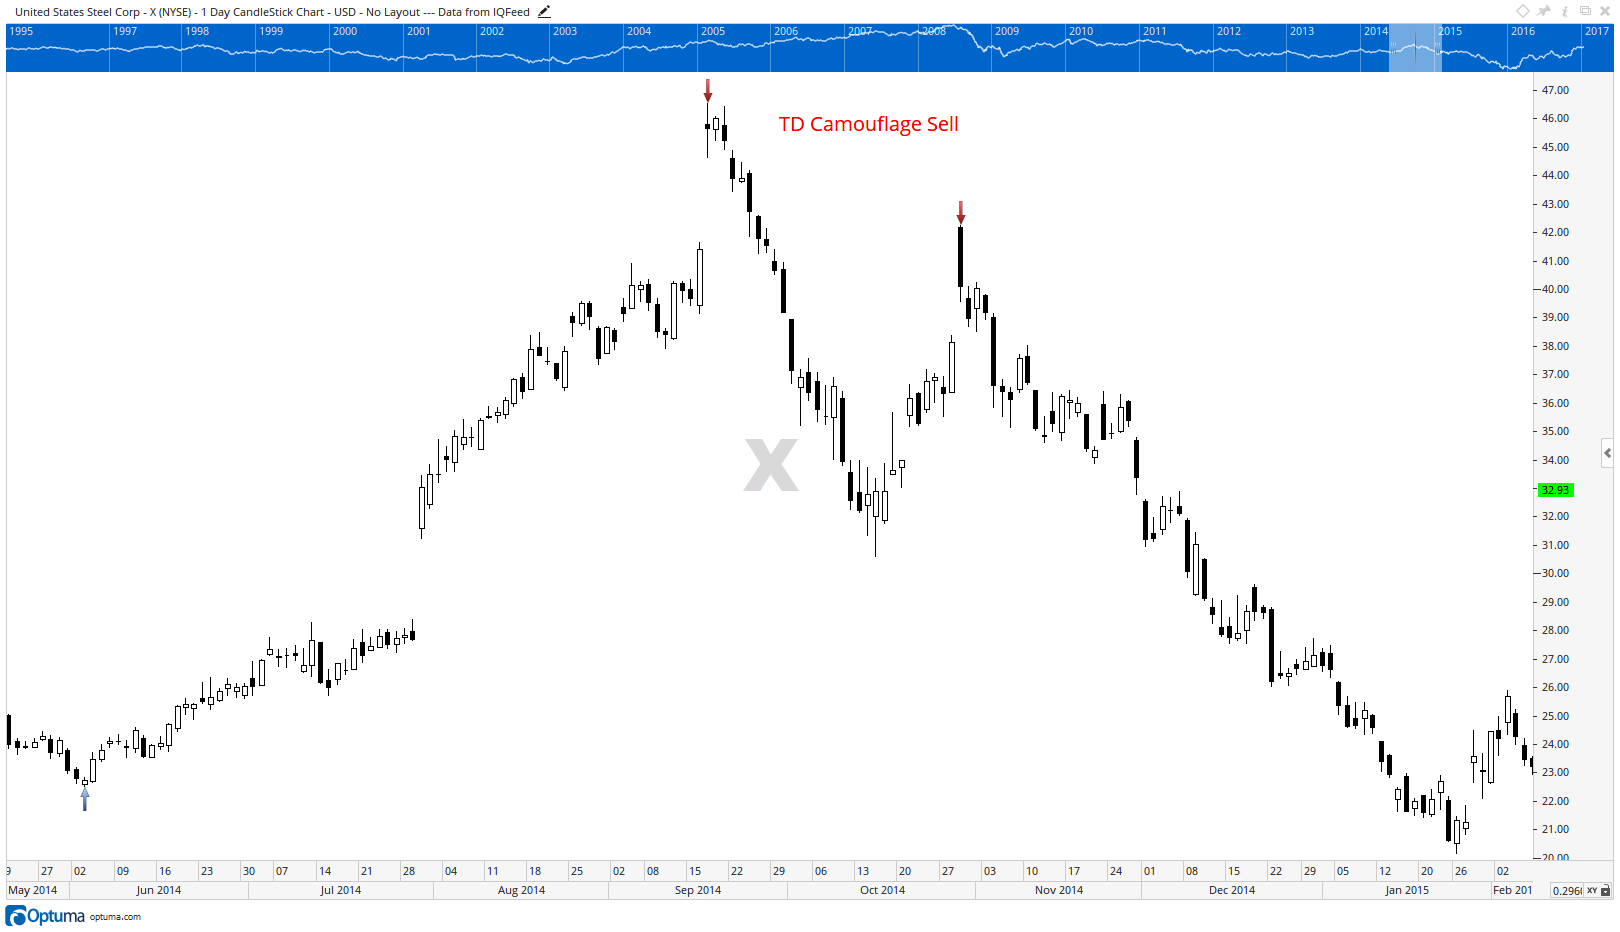 TD Camouflage Sell
This is an aggressive entry that is placed early, just after the start of the day. If the setup works, the entry is triggered at a superior trade fill, compared to taking the trade at the end of the day.
I’d like to stress I only deploy these trade triggers when I am in a low-risk trade zone, so to use TD Open buy setup, I must be in a stochastic low zone.
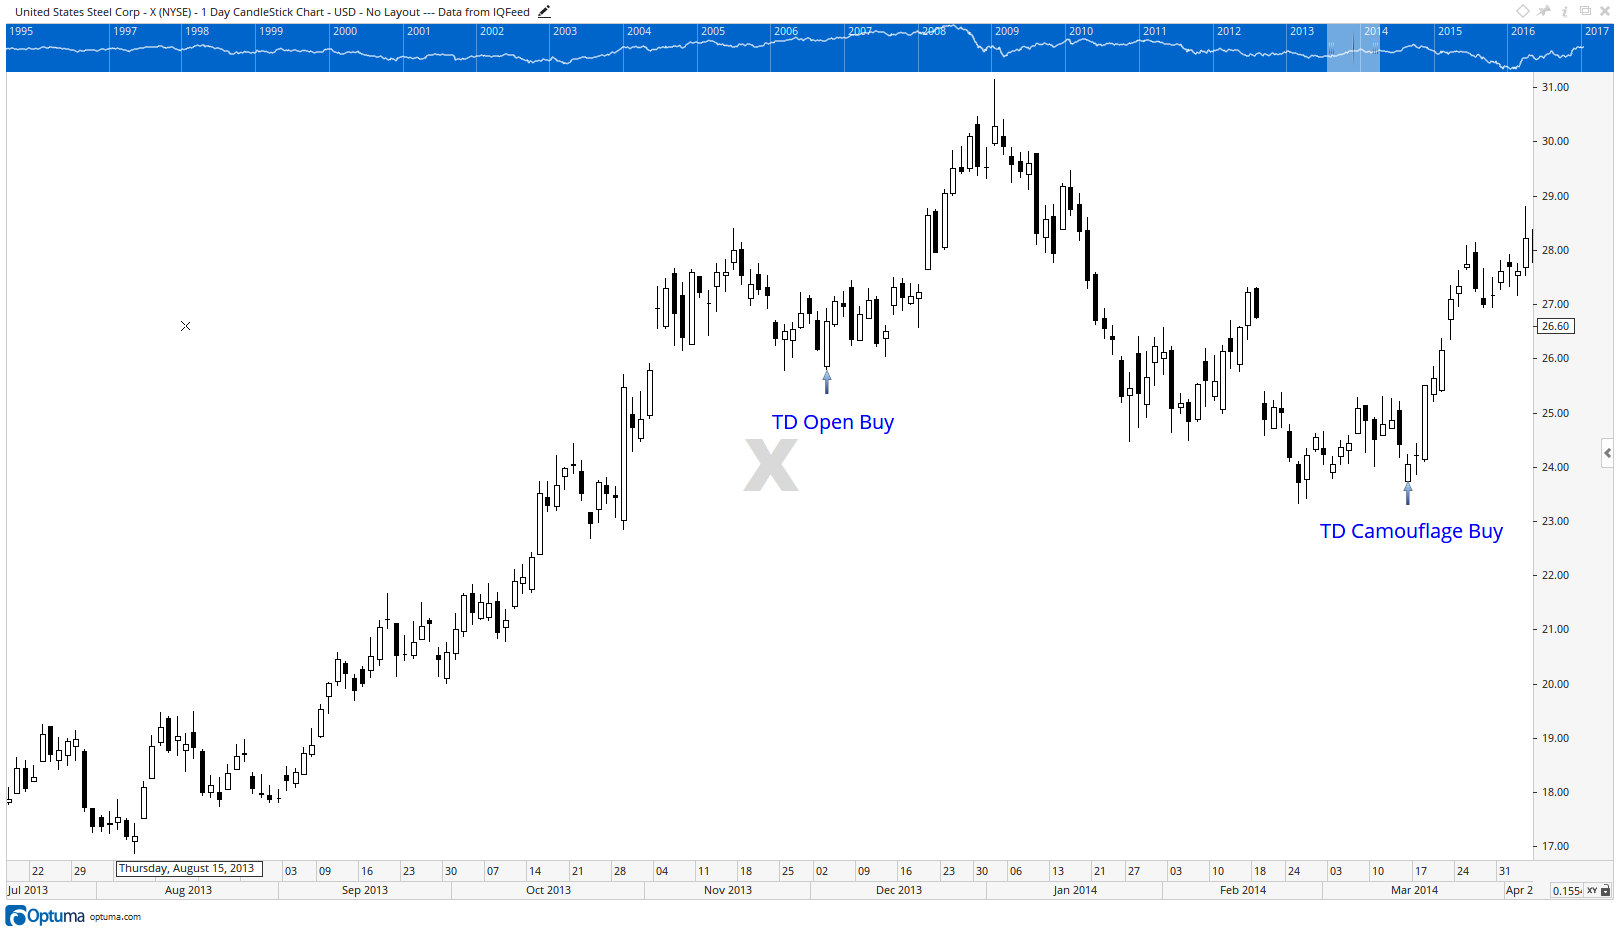 TD Open Buy Setup
This is an aggressive entry that is placed early, just after the start of the day. If the setup works, the entry is triggered at a superior trade fill, compared to taking the trade at the end of the day.
I’d like to stress I only deploy these trade triggers when I am in a low-risk trade zone, so to use TD Open sell setup, I must be in a stochastic high zone.
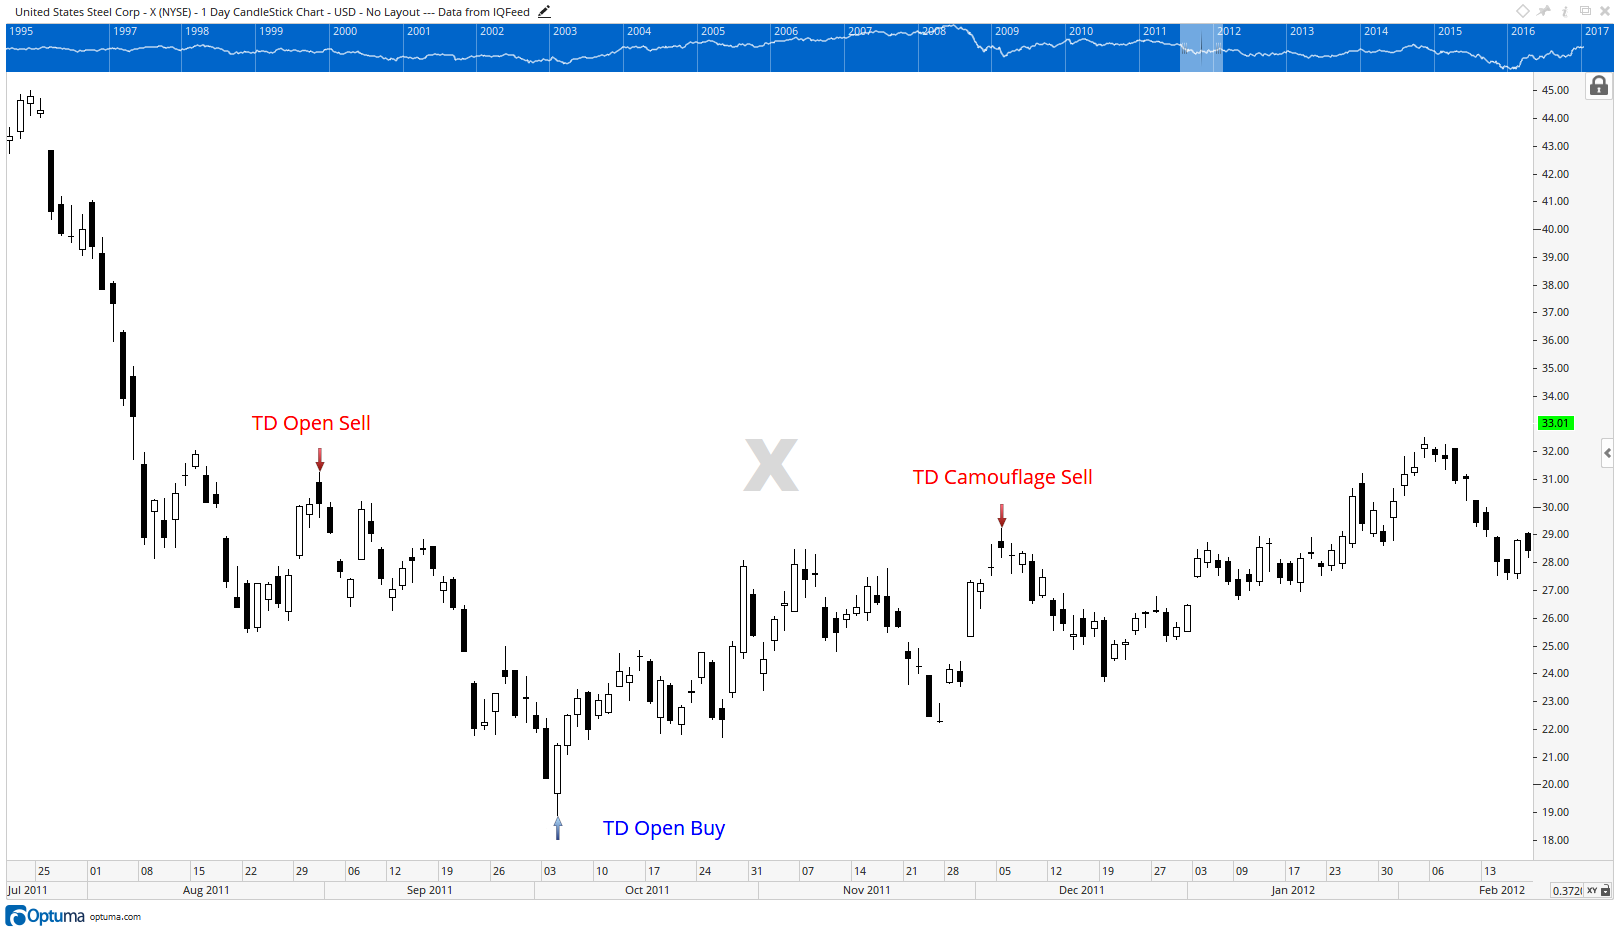 TD Open Sell Setup
This is an aggressive entry that is placed early, just after the start of the day. If the setup works, the entry is triggered at a superior trade fill, compared to taking the trade at the end of the day.
I’d like to stress I only deploy these trade triggers when I am in a low-risk trade zone, so to use TD Trap sell setup, I must be in a stochastic high zone.
Furthermore, as I am primarily an end of day chartist, I can deploy intraday entries like TD Open and TD Trap only if I am in equity run up mode. If I am doing well, I can be aggressive and adventurous in my trade entries. But if I am in drawdown mode, I will not be initiating these two intraday trade setups.
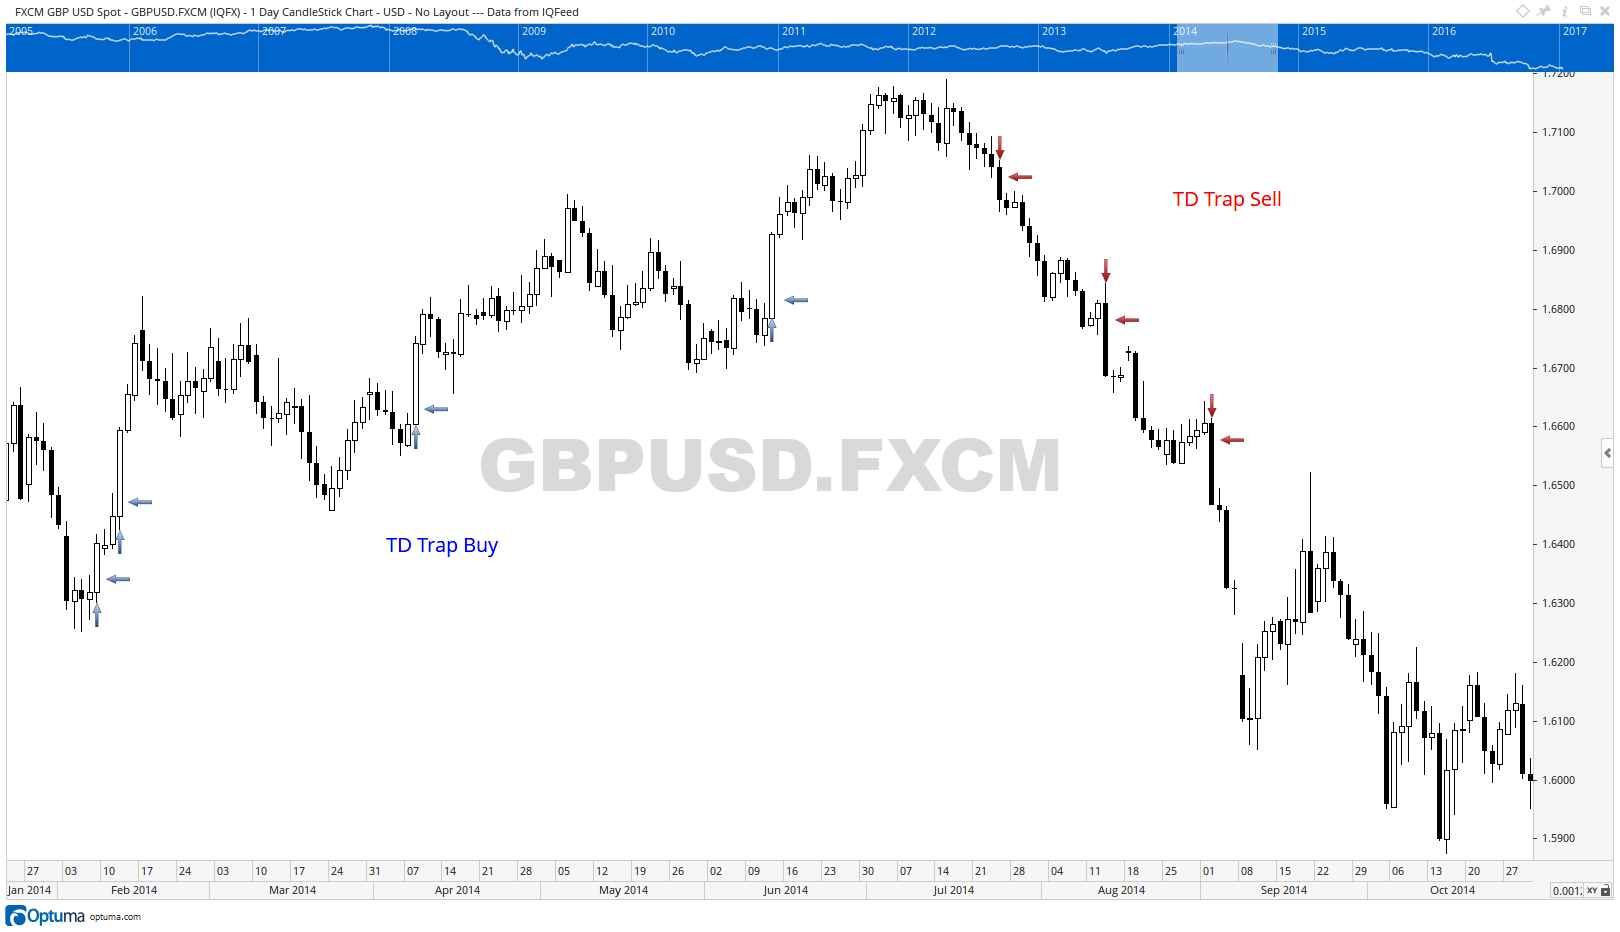 TD Trap Sell Setup
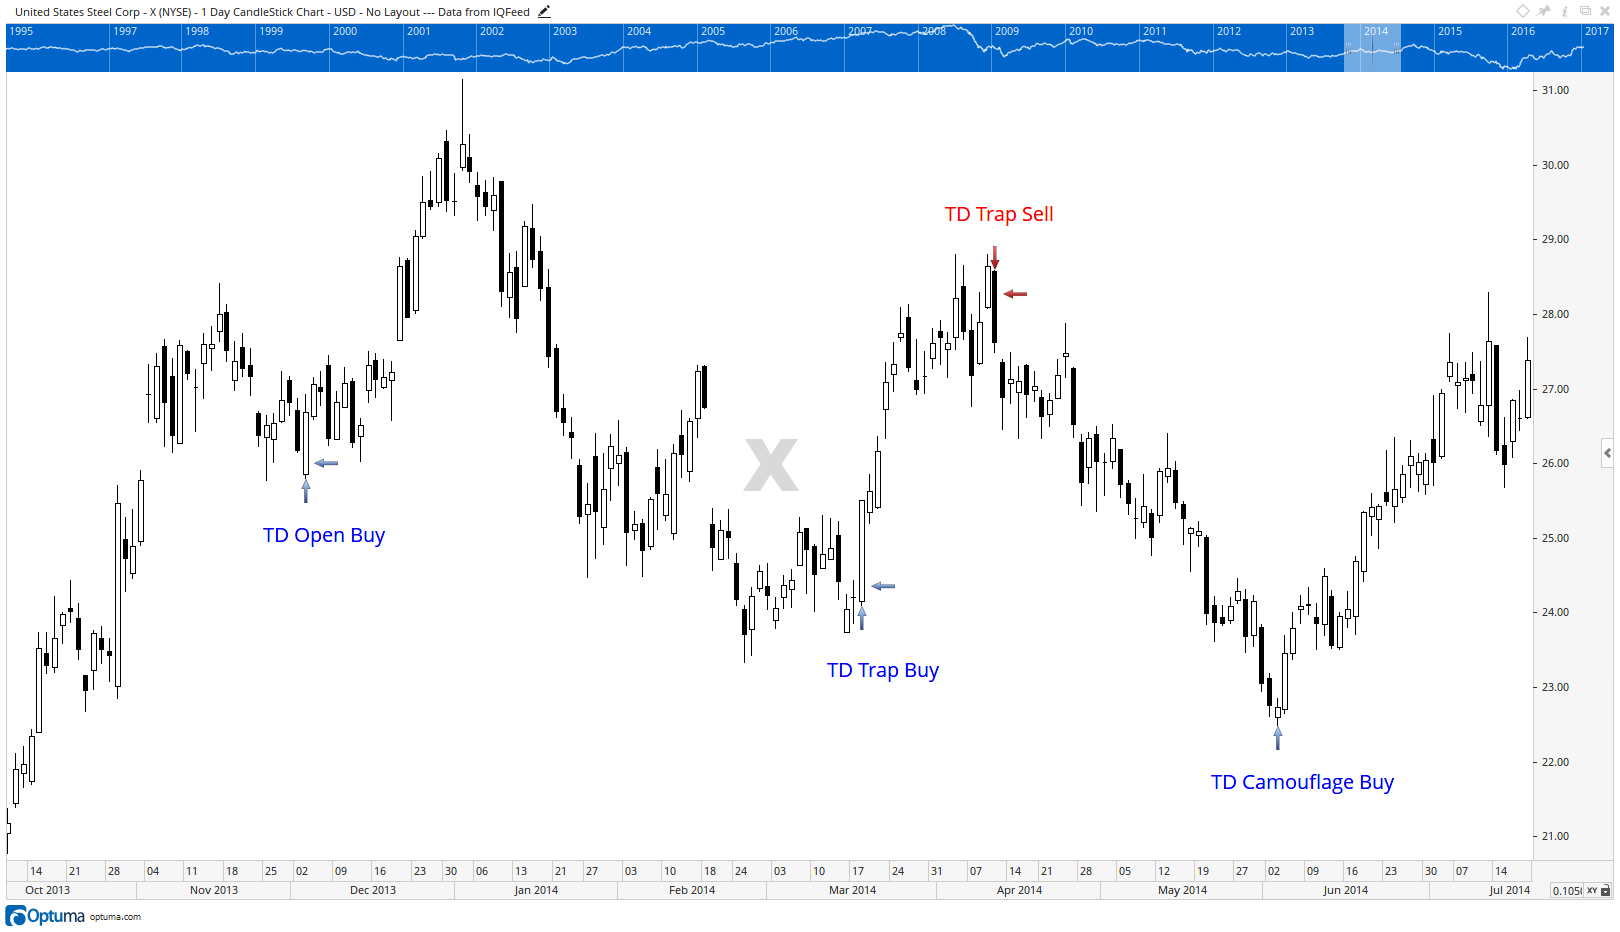 TD Open and TD Trap
I have reached the end of this journey with you. I can say I have used all the triggers described above. Most of my entries are based on the end of day chart. Trading in US Equities, therefore, requires me to be watching the US equity market one hour before the close. I am usually awake at 4 am Singapore time, in order to scan my watch list and to trigger low-risk high probability trades before the market closes at 5 am Singapore time. By default, I also use the close of New York as the arbitrary close for my FX analysis.
CAVEAT: Note - all trades are supposed to be triggered at the close. I will execute the trade within the last 30 minutes of the trading session as it will be exceedingly difficult to execute trades at the close of the day. Therefore, my actual trade entries will not be exactly at the close, but will be fairly near where the market closes.
Good Luck, and Trade Well.
Get blog updates and Optuma News
